-
like (11)
- Comments (2)
- Nov 26, 2013
Instructions on Making Memory Wire Ring with a Seed Bead Sunflower
Summary: How to use memory wire to make a ring? How to make the memory wire ring be more eye-catching? Just visit this page and a beaded flower ring is waiting for you!

In my previous project, I’ve showed my way making a vogue memory wire choker necklace. So, I’ll continue to show you how to make use of these endless loops in jewelry making. Here, this project is all about a memory wire rings design, in which demonstrates the way making a wire rings and a seed bead sunflower by using brick stich technique. Here we go!
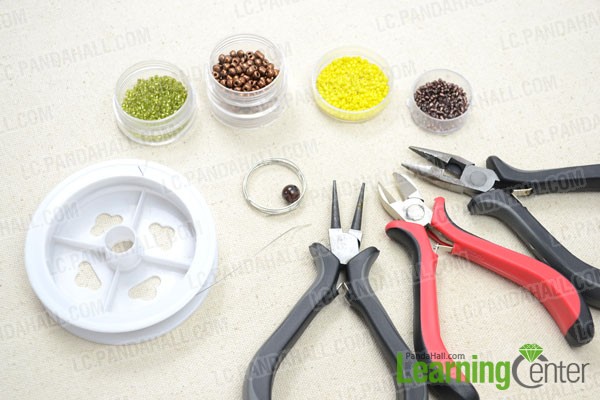
Supplies needed for making a memory wire ring:
8mm Agate Bead
4mm Coconut-Brown Seed Beads
3mm Yellow Seed Beads
3mm Green Seed Beads
2mm Coconut-Brown Seed Beads
Memory Wire
0.3mm Tiger Tail Wire
Round Nose Pliers
Side Cutting Pliers
Wire Cutter Pliers
Hot Melt Glue Gun (optional)
How to make the memory wire ring?
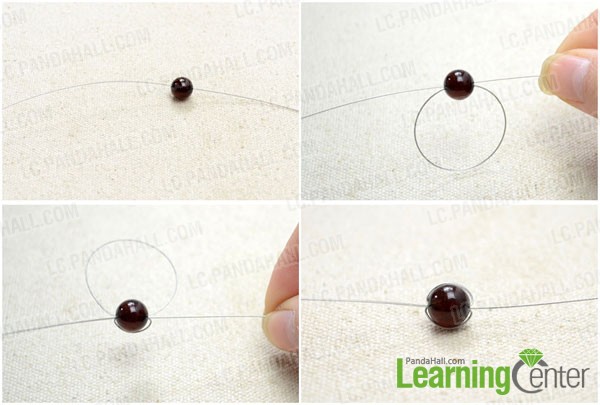
Step 1: Make the flower disk by using brick stich technique
1st, cut a 60cm piece of tiger tail wire and then slide the 6mm agate bead to 6cm from the other end;
2nd, thread the wire through the bead from left to right to make a loop around the outside of the bead. Then, repeat the same process for another loop;
3rd, string two 2mm brown seed beads, then pass the wire under the loop around agate bead. Pull the wire to make the two seed beads rest as picture shows. Finally, weave the wire back up through the second seed bead. Tighten the wire then;
4th, slide one 2mm seed bead, pass the wire under the loop around agate bead, then back up through the newly added seed bead. Pull the wire tightly;
5th, repeat the 4th procedure until surround the agate bead with 2mm seed beads;
6th, when exiting the wire at the last seed bead, you should continue to pass it down through the first seed bead and then up through the last seed bead. Pull the wire tightly;
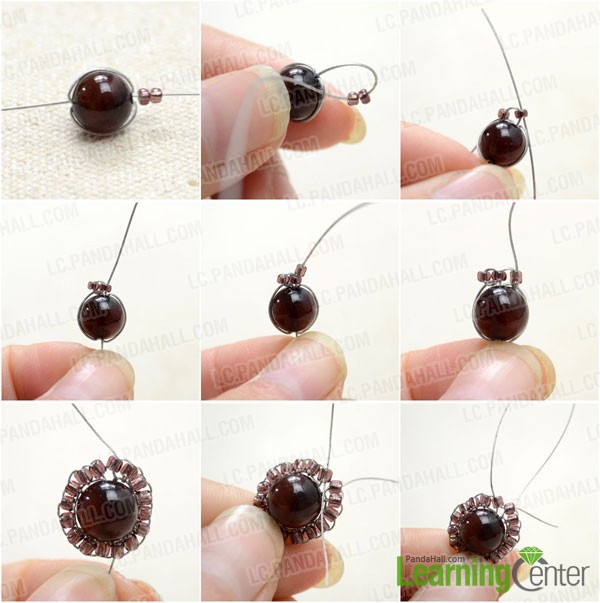
7th, add two 4mm brown seed beads and do the brick stich pattern as did with the 2mm beads.

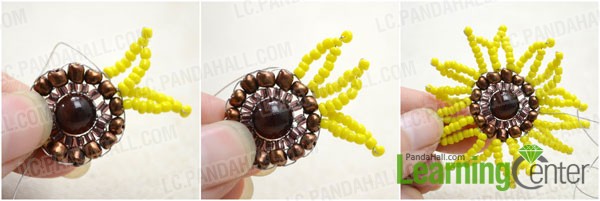
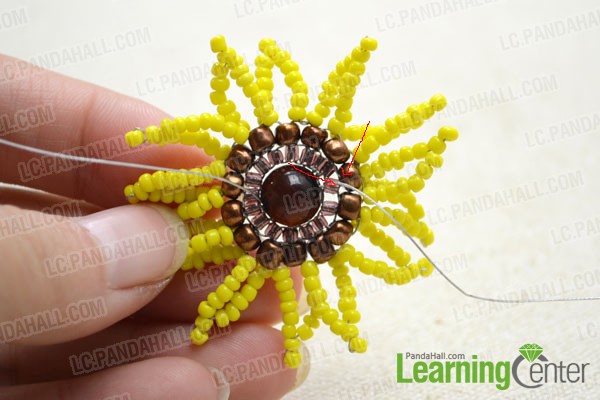
Step 2: Make the petals with yellow seed beads
1st, once exit the wire at the last 4mm brown seed bead, slide eight 3mm yellow seed beads instead;
2nd, pass the wire back through the last but one seed bead;
3rd, string another eight 3mm yellow seed beads;
4th, pass the wire under the exposed wire between two 4mm brown seed beads;

5th, tighten the wire and then repeat the procedures 1~4 for the rest petals.
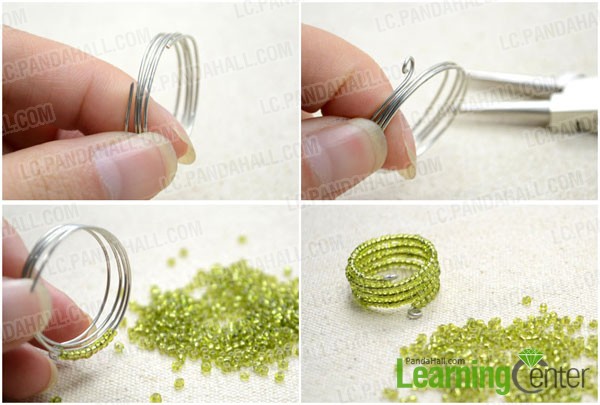
Step 3: Prepare the memory wire ring base
Cut a 4-coil memory wire, loop one end with round nose pliers. Then, string the 3mm green seed beads to cover the wire coils. Finally, make a simple loop at the other end to secure the beads stay in place.
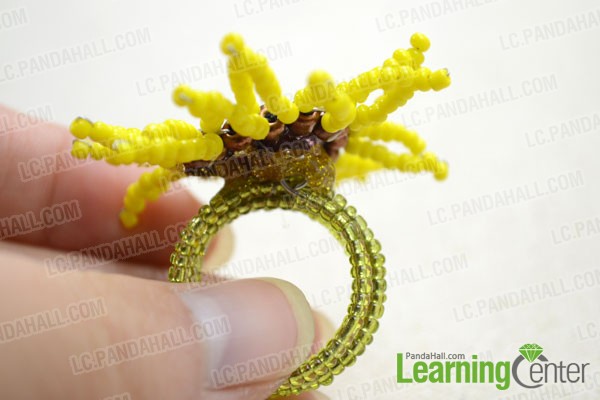
Step 4: Assemble the beaded flower with memory wire ring base
1st, take the semi-finished seed bead sunflower, pass the working wire end down through its adjacent 4mm brown seed bead and 2mm brown seed bead;
2nd, take the beaded memory wire ring and cross the two wire ends through the two loops twice or more times;
3rd, knot the wires firmly and then trim off the leftovers;

4th, seal the part between sunflower and ring with thick glue if necessary.
Done!

So far, you’ve created a new floral element for your wardrobe! If you’ve never work with memory wire, you should know that nothing beats the memory wire in making quick yet stunning jewelry accessory. And this beaded flower memory wire ring is sure to be the next craze among girls! Hope you’ve enjoyed while making this wire ring!


Comments (2)
-

-
Jul 30, 2014 at 11:27 PM NODY sokara
WANDER FUL
-

-
Aug 26, 2014 at 03:53 PM Quinetta James
I love this one. Going to have to make it.


