- Comments (0)
- Sep 01, 2013
Basic Beaded Bracelet Designs - Handmade Crystal Bracelets Made within 10minutes
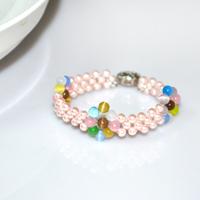
Summary: For an artistic beaded bracelet design, try adding crystal beads to your projects! These handmade crystal bracelets look extremely fancy but are inexpensive to make.
Learn how to make handmade crystal bracelets. It’s so amusing and simple with this basic bead bracelet pattern. In this tutorial, you can use an array of ombre or monochrome crystal beads, several rhinestone bridge spacers, inches of tiger tail wire, crimp beads and a set of multi-strand Interlocking Clasps! Those offer great supplies to make your personal beaded crystal bracelet.

Material list of this beaded crystal bracelet:
6mm Swarovski Crystal Bead (Bicone)
Rhinestone Bridge Spacer
Crimp Bead
Interlocking Clasp
0.5mm Tiger Tail Wire
Side Cutting Pliers
Flat Nose Pliers (not shown)

How to make your own handmade beaded crystal bracelet?
Step 1: Attach three strands of tiger tail wire to the three loops of the interlocking clasp, make each wire he length of your individual wrist circumference.
Step 2: Slide 6 crystal beads to 3 wire strands in the order 3, 2 and 1 (decreasing in the picture). Push the beads towards to the clasp with the remaining wire covered.
.jpg)
Step 3: Slide one rhinestone bridge spacer.
.jpg)
Step 4: Add the crystal beads increasingly. And then one same rhinestone bridge spacer

Step 5: Repeat the steps 2~4 with ombre crystal beads.

Step 6: Once the bracelet reaches an ideal length, attach the other part of clasp as in step 1. Feed the excess wires through adjacent beads.

That’s your new ombre beaded crystal bracelet!

This handmade crystal bracelet sure is charming! Pick up your favorite and get to work so that you will able to add a new piece to your wardrobe. In addition, the rhinestone bridge spacers add fun touches to your bracelet designs so that you will love them as well as me!


