- Comments (0)
- Aug 21, 2013
Jewelry Making for Kids-Design Your Own Ring
Summary: This is a cute tutorial on jewelry making for kids of all ages. While following the tutorial, enjoy the process of designing your own ring.
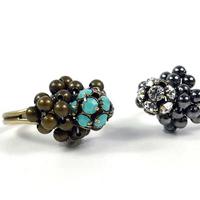
Rings are an extremely amusing jewelry to make that is full of childishness and playfulness. As a special tutorial on jewelry making for kids, I made use of a focal faceted-round glass bead that is surrounded by several colorful wooden beads. While you design your own ring, you may selectively replace any of the beads with any type you want.

Materials to design your own ring
10 Faceted-round Glass Bead
2mm Round Seed Bead
3mm Wooden Bead
Nylon Wire
Scissors
How to start the jewelry making for kids?
Step 1: Bead the focal part
1. Take about 80cm long of the nylon wire and slide on the focal glass bead to 3/4 the length of wire.
2. On the right end, string on 7 pieces wooden beads for a 10mm focal bead.
3. Direct the wire to go through the focal bead in counter-clockwise direction.
4. Do the procedure again with right end for another half in clockwise direction.
5. Pull the ends tautly. Next, add one wooden bead in the blank spots between the two half parts to complete the beaded circle.

Step 2: Work the ring band
1. Weave the wire to make the two ends exit at the top of the two wooden beads.
2. On each end thread on 3 pieces of 3mm seed beads.
3. Pass two ends through another 3 pieces of seed beads and pull the ends tightly.
4. Do add beads and crisscross until the band fits for your finger snugly.
5. In the end, insert one end through the bottom 2 wooden beads. Tie a knot and then cut off the leftovers.

Today’s jewelry making for kids tutorial is over. The way design your own ring may vary largely depending on the beads, pattern and color palette you choose. You can make anything with a little imagination! Nice Day!
Source: instructables