- Comments (1)
- Aug 11, 2013
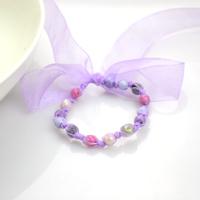
Chic Beading Design-Make Your Own Bracelets Using Coral Beads and String
Summary: With only a strand of chipped coral beads and some nylon thread, we’ll showcase to you one very chic beading design so that you can make your own bracelets.
Coral is well known for its bold red color and smooth appearance, and it is regarded as a precious gem. In recent years, it has been widely adopted for making trendy beading designs. No matter which skill level designs require, people are deeply attracted by its glamor. Read on to learn how to make your own bracelets using these versatile elements and string.

Supplies you will need for this beading design
Coral Bead Strand
Round Glass Bead
1mm Nylon Thread
Scissors
Lighter (not shown)

How to make your own bracelets?
Step 1: preparations
Cut 6 strips of 1mm nylon wire, 5 strands that are 100cm long and 1strand that is about 150cm long.
Fold them in half around your index finger.
Take the longer cord and start to wrap the rest of the cords near the center of the fold.
When the wrapped part is big enough for the round glass bead to go through, close the circle off by wrapping all of the 11 cord ends together.
After several wraps, secure the coils with two forward knots.

Step 2: make your own bracelets pattern
1. Divide the 12 threads into 7 groups like 1-2-2-2-2-2-1.
2. Tie the inside cords 2 by 2, using overhand knots.
3. Make the strands into 6 groups, like 2-2-2-2-2-2.
4. Tie overhand knot 2 by 2.

5. Repeat the above 2 patterns alternately for the rest of the bracelet part. Just make sure to add on the coral beads before tying the knot, each knot should have one bead. Either cord will be ok.
.jpg)
6. When the beaded part has reached the desired length, finish the bracelet as you started it without the beads.

Step 3: add on the glass bead for closure
Pick out the center two cords and thread on the round glass bead.
Turn over the bead and wrap the rest of the cords using the two cords.
When the wrapped part is as same as the starting loop, secure it with two forward knots.
Trim off all leftovers thread.

There it is!


Comments (1)
-

-
Feb 07, 2014 at 07:37 AM Judith Wolford
you used to have a real tutorial here. Where did it go?


