- Comments (0)
- Aug 07, 2013
Handcrafted Beaded Jewelry Designs- DIY Beaded Pearl Bangle
Summary: The tutorial introduces you handcrafted beaded jewelry designs with step-by-step illustrated instructions, which to a large extent helps you finish out the chic beaded pearl bangle.
In this DIY beaded pearl bangle project, what I focus on is the peyote stitch technique that can also be learnt in details at our beading technique section. I love this sort of double-colored-mixture pattern, therefore I applied it into this handcrafted beaded jewelry design.

Materials and tools
4mm khaki glass pearls
4mm orange glass pearls
0.3mm tiger tail wire
Lobster clasp
Jump ring
Round nose plier
Flat nose plier
Wire cutter

Instructions:
Step 1: start to weave beads
1st, snip a long enough wire for weaving the beads;
2nd,secure a grey bead at one end as a temporary closure and then slide 4 ivory and 4 orange glass pearls on; the first row is done;
3rd, pick one ivory pearl, skip the last strung orange pearl and thread wire back through the adjoining orange pearl;
4th, add another ivory pearl, skip one orange pearl and back through adjoining one; similarly add one orange, skip an ivory and back through adjoining ivory;
5th, continue adding, skipping and backing through, the second row is done.

Step 2: continue peyote stitches
1st, add beads in your favorite way and continue above peyote stitches until you get the desired length of this bicolored bracelet;
2nd, remove the grey bead, and cut off extra wire at both ends.

Step 3: attach clasp to bangle
Attach lobster to one end and a jump ring to the other end of the finished bracelet.

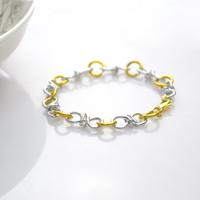
The final look is like this:

Tada, the tutorial for this DIY beaded pearl bangle is done! After mastering this simple and basic technique, you can create much more handcrafted beaded jewelry design on your mind and create different patterns too.