- Comments (12)
- Jan 06, 2013
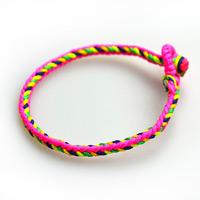
How Do You Make Easy Knot Friendship Bracelet out of Carrick Bend and Alpine Bend
Summary: By learning this easy knot friendship bracelet, you will grasp two kinds of old knotting ways: Carrick Bend and Alpine Bend. Both knots can be used in your knot friendship bracelet.

Wanna buy some friendship bracelets? No! Why not try making a significant one by yourself? Now an easy knot friendship bracelet tutorial is displayed here for you, which was used two old kotting ways: Carrick Bend and Alpine Bend. Hope you will like it!
Materials needed for making carrick bend friendship bracelet:
1mm Nylon Thread (red & yellow)
8mm Acrylic Bead
Scissors

How to make carrick bend knot friendship bracelet?
Step1: Make the decorative Carrick Bend
Measure the size of your wrist size and then snip two strands of yellow nylon wire about 20cm longer than that (usually each should be kept 35cm long); next, you can start to make the Carrick Bend for your friendship bracelet:
1st, fold the thread ① and lay its below tip across the another one; then put the thread ② under the folded location of thread ①;
2nd, hold the above half tip of thread ② to weave through the existed thread sections over and under according the diagram shows;
3rd, adjust the four thread tips and slightly tighten the thread.

Step2: Complete the Carrick Bend for easy knot friendship bracelet
1st, as shown in the diagram 1 & 2, take another two 35cm long red thread strands and weaving in the corresponding methods along the outer edge of the yellow ones;
2nd, in the next, repeat the same processes along the inner of yellow ones with two 90cm long red threads.
3rd, ensure the red threads staying beside the yellow ones and then pull tightly all the threads.

Step3: Make the Alpine Bend for rest knot friendship bracelet portion
According to the diagrams shows, the rest portion of bracelet is consisting of mass Alpine Bends.

Step4: Do the closure of knot friendship bracelet
When there only remains two wire ends in each side, cross the four ends and take another wire strand to make a natural closure by the square knot.

Here, you have obtained a new fabulous gift for your friends now. The center Carrick Bend, in the knot friendship bracelet, just rightly symbolize two hand-in-hand person; and the Alpha Bend, which can be tight steady even there is only one of it, just show the forever love between you and your friends. Doesn’t that sound so fantastic? For more tutorials about making easy knot friendship bracelets, welcome to take a look at here!

Comments (12)
-

-
Jul 11, 2014 at 05:23 PM greg yoon
More details for the second part pleaseee!!! I dont get it D:
-

Jul 23, 2014 at 01:04 AM April Young greg yoon
Take another two strands of red thread and do repeat the 1st step on two sides of the yellow one!
-
-
-
Jul 24, 2014 at 06:41 AM amazing arzoo
please give me more detail about step 3
-
Aug 12, 2014 at 07:03 PM April Young amazing arzoo
For the step-by-step instructions about knot, please head over to: http://lc.pandahall.com/articles/251-chinese-knotting-tutorial-how-to-tie-a-snake-knot.html
-
-
-
Aug 03, 2014 at 01:28 PM hershel ooley
can you show more details about the alpine bend?
-
Aug 12, 2014 at 07:02 PM April Young hershel ooley
Alpine Bend is another name of the Chinese Snake Knot. For the step-by-step instructions, please head over to: http://lc.pandahall.com/articles/251-chinese-knotting-tutorial-how-to-tie-a-snake-knot.html
-
Aug 13, 2014 at 01:49 PM hershel ooley April Young
ok thanks. I thought it looked like a snake knot. just was not sure. that was a big help. ;)
-
-
-
Aug 09, 2015 at 06:35 PM Jacqueline Young
more details on steps 5 & 6 please.
-
Aug 09, 2015 at 07:20 PM David Trippany Jacqueline Young
For the step-by-step instructions about knot, please head over to: http://lc.pandahall.com/articles/251-chinese-knotting-tutorial-how-to-tie-a-snake-knot.html
-
-
-
Aug 29, 2015 at 05:16 AM Jarred Froggatt
Can't do carrick bend doesn't look right I've followed all the steps but it just come out like a horrible looking knot more details please
-

Aug 30, 2015 at 07:24 PM Sunny Smith Jarred Froggatt
Hello, glad to help you, pls find the video tutorial for carrick bend knot @http://www.animatedknots.com/carrick/index.php?Categ=boating
-
-
-
Nov 07, 2021 at 07:43 PM Sze Lee
Hello! The pictures are not loading properly, is there a way to get a copy? Thank you!


