- Comments (0)
- Aug 02, 2016
Pandahall Instruction on How to Make a Flower Slave Bracelet with Ring Attached
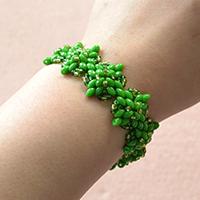
Summary: Wanna own a beaded ring bracelet? This tutorial will show you how to make a beaded slave bracelet, hope you will like it.

As shown in the picture above, today I will share you a DIY flower bracelet with a ring attached. This beaded ring bracelet is quite chi and lovely, so if you also interested in it, follow this detailed instruction on how to make a beaded slave bracelet to make you own.
Supplies you’ll need for making this DIY flower bracelet:
6x4MM Faceted Abacus Glass Beads
8x6MM Faceted Abacus Glass Beads
8MM Red Pearl Beads
2MM Seed Beads
6MM White Pearl Beads
3MM Round Pearl Beads
Golden Spacer Beads
Jump Rings
Brass Ring Base
0.3MM Tiger Tail
Lobster Clasp
Scissor
Glue Gun

Instruction on how to make a beaded slave bracelet:
Step 1: Make the basic bead pattern
1st, cut a piece of tiger tail, slide a 6mm pearl, 4 3mm pearl beads, a 6x4mm glass bead and a seed bead to it, then cross the wire back through the glass bead;
2nd, slide 4 3mm pearl beads to the wire, then cross bother wires through the last 2 pearl beads;
3rd, slide 2 3mm pearl beads, a 6x4mm glass bead and a seed bead to one wire, cross the wire back through the glass bead and continue to add 2 3mm pearl beads, then cross both wires through another 2 3mm pearl beads.

Step 2: Finish the bead flower
Repeat step 1 to make more bead patterns, and then cross both wires through the 2 pearl beads in the first bead pattern to form a bead flower.

Step 3: Make other pattern of the bracelet
1st, slide 4 3mm pearl bead to both wires respectively, then cross both wires through a 8x6mm glass bead;
2nd, repeat 1st to make other 2 such bead patterns, then slide 2 3mm pearl beads to each wire respectively, and tie the wires to a jump ring firmly.

Step 4: Finish the DIY flower bracelet
Repeat step 3 to make the left side of the DIY flower bracelet, then attach a lobster clasp to the wires.

Step 5: Make a beaded string
1st, cut a piece of tiger tail, cross it through a seed bead in middle part of the bead flower, then slide 13 3mm pearl beads, 4 6x4mm glass beads, 2 8x6mm glass beads and a 8mm pearl bead to the wires in sequence as pictured;
2nd, slide 4 3mm pearl beads to one wire, slide 4 3mm pearl beads and a golden spacer bead to the other wire, then cross this wire through the adjacent pearl beads;
3rd, slide a 3mm pearl bead, a spacer bead and a 3mm pearl bead to one wire while slide a 6mm pearl bead to the other wire, and then cross both wires through another 2 3mm pearl beads.

Step 6: Finish the bead ring
1st, slide 2 3mm pearl beads, a 6x4mm glass bead and a seed bead to the left wire, then cross the wire through the glass bead and slide a 3mm pearl bead to it;
2nd, slide a spacer bead to the right wire and cross both wire through another 2 3mm pearl beads;
3rd, repeat above steps to make other 2 such bead patterns, then slide a 6mm pearl bead to left wire while slide a 3mm pearl bead, a spacer bead and a 3mm pearl bead to the right wire , then cross both wires through the adjacent 2 pearl bead in the first bead loop.

Step 7: Add a red pearl bead to the bead ring
1st, cross one wire along the beads, then slide a red pearl bead to both wires and cross them through adjacent bead and cut off the excess wires;
2nd, cut a piece of tiger tail, cross it through a pearl in the flower bracelet, add a red pearl bead to both wires and cross them through adjacent bead in the flower and cut off the excess wires.

Step 8: Glue a ring base on back of the bead ring with glue gun.

Here is the final look of this beaded ring bracelet!

Now I’ve finished this DIY flower bracelet yet, isn’t it really nice? If you also like it, follow me to DIY one yourself! Anyway, may you a wonderful time~