- Comments (0)
- May 10, 2016
Pandahall Original DIY Project - Vintage Black Seed Bead Choker Necklace
Summary: Wanna learn chick necklace? If yes, you can never miss today’s Pandahall original DIY project - vintage black seed bead choker necklace.

If you are lack of a choker necklace, look here! Today, I’ll share you how to make vintage black seed bead choker necklace. It’s very funny to make. Now, let’s get started~
Materials needed for the choker necklace:
jewelry making findings Iron Jumprings
18x8.5~9mm Red Glass Pointed Back Rhinestone Cone
0.3mm Light Grey Tiger Wire
11.5x6mm Silver Round Brass Magnetic Clasps
3mm Black Seed Beads
Chain Nose Pliers
Scissors
Needle
0.3mm Black Nylon Sewing Threads

Step 1:Make the base of the choker necklace
1st, cut off a proper length of black nylon sewing thread and slide four black seed beads on it, then cross the sewing thread;
2nd, add three black seed beads on the sewing thread and cross it;
3rd, continue to slide three black seed beads on it and cross the sewing thread.

Step 2: Continue to add seed beads
Repeat the same ways mentioned in Step1 several times until the length is enough for you.

Step 3: Make other round of the necklace
1st, after the length is enough,add four black seed beadson the threas,then cross it back through the opposite black seed bead in the next beading unit and thread thread the sewing thread through the beading unit again;
2nd, slide two seed beads on the sewing thread and cross back the next black seed bead to form a beading unit, please see the showing picture below;
3rd, thread the sewing thread though the bead in the center until arrive at the next beading unit and then continue to add two seed beads and cross back;
4th, repeat the same ways several times at your own will.

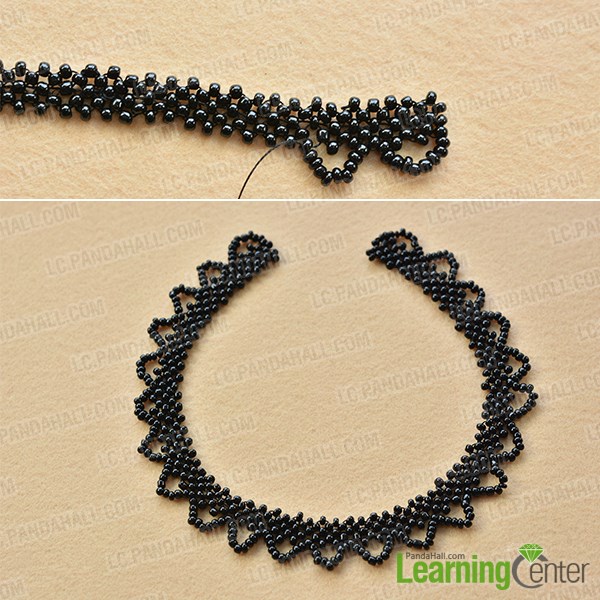
Step 4: Decor the necklace with seed beads
After the length is enough, add nine black seed beads on the sewing thread and thread it through the fourth black seed bead on the opposite side.

Step 5: Continue to decor the choker necklace with seed beads
Repeat the same ways mentioned in Step4 until the length is enough for you, and then trim off the excess sewing thread.
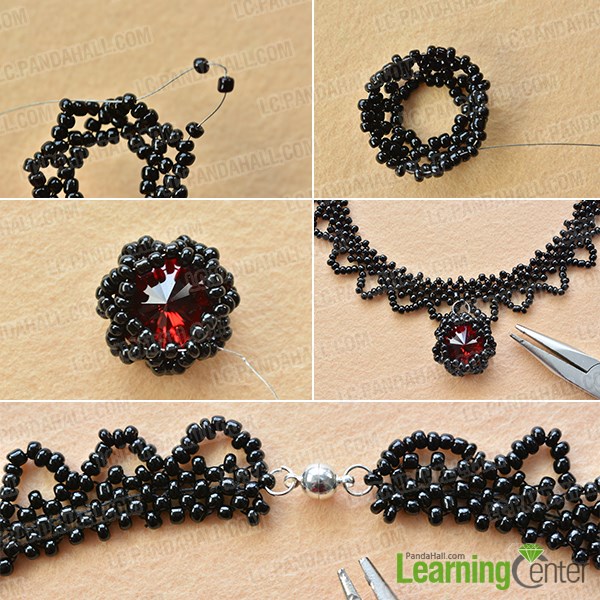
Step 6: Make the pendant part of the choker necklace
1st, cut off a proper length of tiger wire and slide twenty one seed beads on it, then cross it;
2nd, thread the wire through the next seed bead and slide two seed beads on it;
3rd, continue to thread it through the next seed bead and slide two seed beads on it;
4th, repeat the same ways several times until the circle is full;
5th, slide five seed beads on the wire and then thread it through next seed bead;
6th, repeat the same ways six times to form a flower shape.

Step 7: Finish the choker necklace
1st, add three seed beads on the wire and thread it through the next beads;
2nd, repeat the same ways six times;
3rd, add the red rhinestone bead in the center of the pendant part;
4th, connect the pendant part and the choker necklace with a jumpring;
5th, hang a jumpring on both brass magnetic clasp and then hang them on each end of the necklace.
Time for the final look of the choker necklace:

Wow, really stunning! Love today's Pandahall original DIY project? As you can see, the materials of the choker necklace are easy to find. So if you wanna try the Pandahall tutorial, try your best! And if you need help, please feel free to ask me or leave a comment. Hope you a nice try and have a good day~