- Comments (1)
- Apr 05, 2016
How to Make a Pink Nylon Thread Kumihimo Bracelet with European Rhinestone Beads
Summary: Kumihimo braiding pattern is extremely popular among thread friendship patterns. Here I will show you a detailed kumihimo braiding instruction below.

Kumihimo braiding bracelet is not that difficult to make with the help of a kumihimo disk. Today I get all the supplies prepared to start this lovely pink nylon thread kumihimo bracelet with European rhinestone bead decorated. Now let's check the steps together.
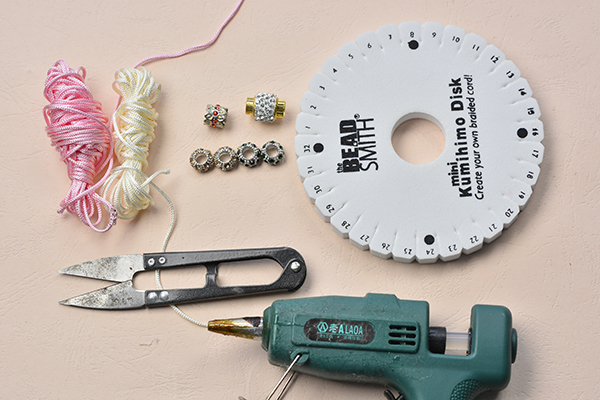
Supplies needed in the pink nylon thread kumihimo bracelet with European rhinestone beads:
11mmx16mm Alloy Rhinestone European Beads
2mm Pink Nylon Thread
2mm Ivory Nylon Thread
Rhinestone Magnetic Clasp
Red Stone Metal Beads
Glue Gun
Glue Stick
Scissors
Instructions on making the pink nylon thread kumihimo bracelet with European rhinestone beads:
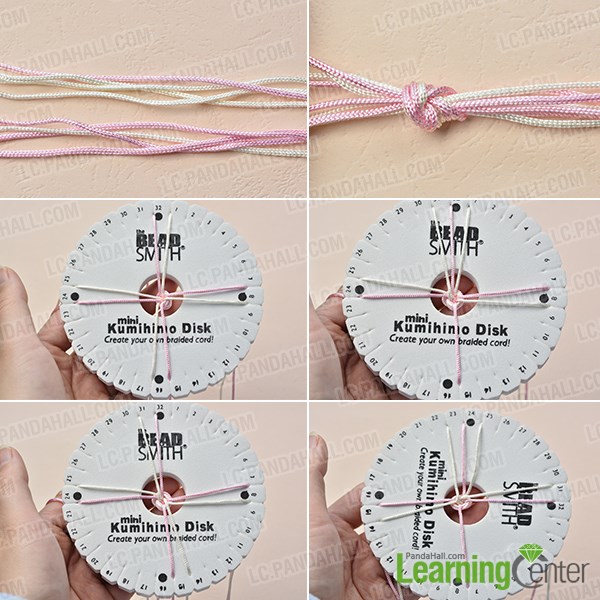
Step 1: Braid the bracelet cord
1st, cut 4 pieces of ivory nylon threads and 4 pieces of pink nylon threads separately and then make a basic knot;
2nd, put the nylon threads on the kumihimo disk : an ivory thread and a pink thread inserted on the upper side, the left side and the right side and the bottom side of the disk respectively, making a cross shape as shown in the picture below;
3rd, shift the ivory thread upward to the teeth next to the pink one, then down to the bottom teeth next to the pink thread as shown;
4th, shift the ivory thread to the teeth next the pink thread on the left, tighten the thread a little bit.
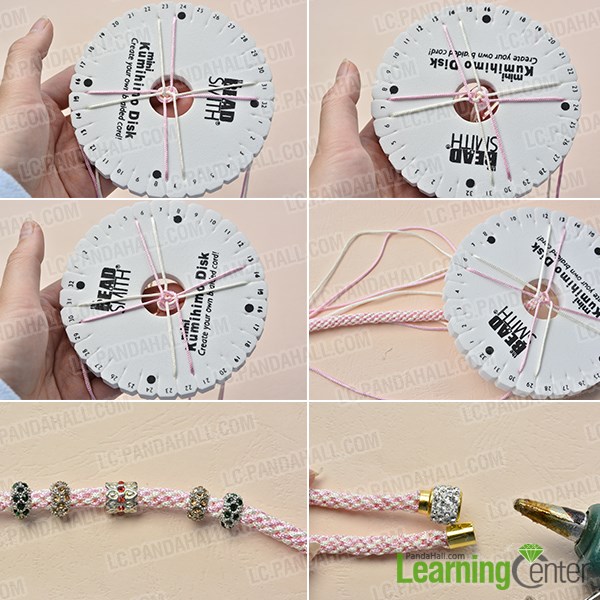
Step 2: Finish the kumihimo bracelet
1st, shift the pink and ivory thread in the No.6 and No.7 teeth to No.5 and No.6 teeth respectively;
2nd, shift the pink and ivory thread in the No.29 and No.30 teeth to No.30 and No.31 teeth respectively;
3rd, repeat the pattern and always move the thread to the next teeth, until you've braided a proper length for your wrist;
4th, thread some colorful European rhinestone beads through the bracelet cord as you like;
5th, glue the ends of the bracelet cords to a rhinestone magnetic clasp respectively.
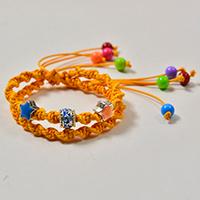
With patience required, this pink nylon thread kumihimo bracelet with European rhinestone beads is finished as below:

There have been several kumihimo bracelet patterns on this website, and we will keep updating various designs for kumihimo braiding. If you are quite interested in kumihimo bracelet diy, why not have a try? Also just stay in tuned if you want to learn more braiding skills from us.
Comments (1)
-

-
Oct 18, 2017 at 07:45 PM Katherine Donley
You forgot the most important thing. How long do we cut the cords?


