- Comments (0)
- Apr 05, 2016
Guide on How to Make a Multi-stranded Pearl Choker Necklace with Personalized Tibetan Style Cabochon
Summary: Wanna try an elegant pearl stranded choker necklace at home? Here is a detailed guide for you!

Cabochons are best for personalized jewelry DIY, thus today I picked some cabochons and pearl beads of different sizes to start my elegant multi-strand pearl choker necklace with cabochon. Follow my steps below if you love and want to have a try.
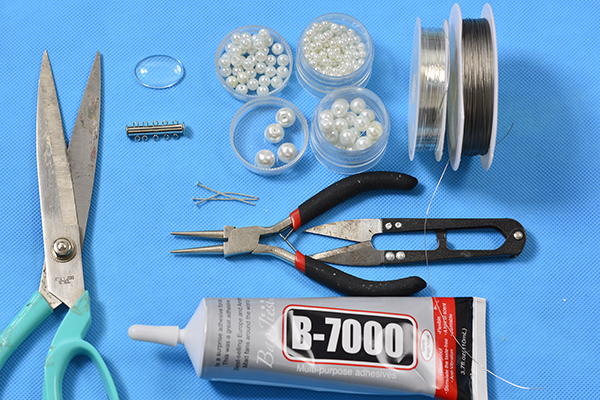
Supplies in making the elegant multi-strand pearl choker necklace with personalized Tibetan style cabochon:
Tibetan Style Pendant Cabochon Settings
6mm White Glass Pearl Beads
4mm White Glass Pearl Beads
8mm White Glass Pearl Beads
10mm White Glass Pearl Beads
Brass Magnetic Slide Lock Clasps
Iron Lobster Clasps
Iron Headpins
0.3mm Copper Wire
0.3mm Tiger Wire
Round Nose Plier
Scissors
Glue
Instructions on making the multiple-stranded pearl choker necklace with personalized tibetan style cabochon:
Step 1: Make the multiple-stranded necklace cords
1st, cut 5 pieces of tiger wire (each about 70cm) and tie each of them to the hole of the brass slide lock clasp respectively;
2nd, combine the 2 wires on each line, and slide 6mm white glass pearl beads thread then respectively;
3rd, slide enough pearl beads until the whole lengthen fits your neck, and then tie the other ends of the tiger wire to the opposite side of the brass clasp as shown and finally trim off the wire.

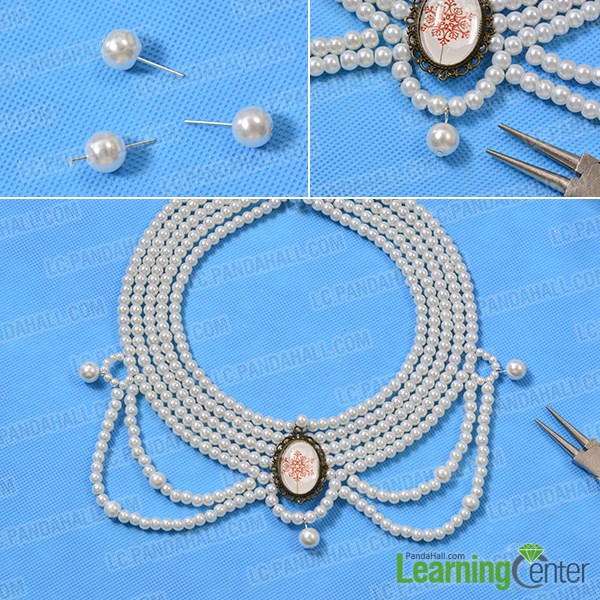
Step 2: Add the personalized Tibetan style cabochon setting
1st, chose a piece of picture as you like, and cut it into a certain shape that fits the cabochon;
2nd, stick the picture on the tibetan style setting with glue;
3rd, glue the transparent glass cabochon on the surface of the setting as shown;
4th, cut a piece of 0.3mm copper wire, tie it to the hole of the cabochon and thread through a 6mm white pearl bead;
5th, wrap and tie the wire to fix the pearl bead, and trim off the excessive wire.

Step 3: Add pearl stranded collar
1st, cut a piece of copper wire (long enough), slide 12 white pearl beads to it, then thread each end of the wire through a white pearl bead next to the cabochon respectively;
2nd, slide 9 6mm pearl beads, a 8mm pearl bead, 9 6mm pearl beads to each wire respectively, then thread each wire through 2 6mm pearl beads on the original pearl strand as shown;
3rd, now slide 8 4mm white pearl beads this time, then thread the wire through the 2 6mm pearl beads again and tighten up; (do the same for the pearl strands on both sides)
4th, slide 11 6mm white pearl beads, a 8mm pearl bead, 11 6mm pearl beads to the wire, and finally tie it to the loop and trim off the wire. (same for both sides)

Step 4: Add glass pearl drops
1st, prepare 3 iron headpins, and thread a 10mm white glass pearl bead to each of them and twist a loop at the end respectively;
2nd, hook the pearl drop dangle to the middle, left side and right side of the whole choker necklace respectively as shown.
With time and efforts, this elegant multiple-stranded pearl choker necklace with personalized cabochon is finished!
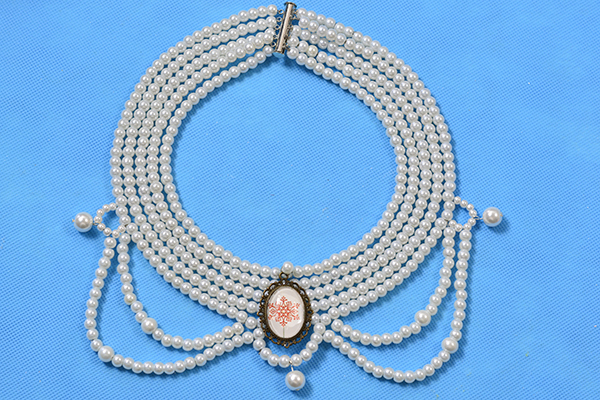
The main procedure in making this elegant multi-stranded pearl choker necklace is to string the pearl strand, making it easier that you think it might be. This pearl choker necklace is also a good choice to wear on wedding. No more hesitation, make it a try!