- Comments (0)
- Mar 02, 2016
Pandahall Tutorial on How to Make a Colored Homemade Beaded Pen Holder
Summary: Do you want own a unique pen holder? You may fall in love with this colored homemade beaded pen holder. Follow me to see how to make this homemade beaded pen holder.

Is there a place for all those extra pens? Homemade pen holders can range from basic kid's crafts to creative ways to express feelings for a special someone. This DIY project will show you how to make a colored homemade beaded pen holder. Now, let's see the details.
Materials and tools needed in DIY the homemade beaded pen holder:
5.5mm Yellow Oval Acrylic Beads
5.5mm Orange Oval Acrylic Beads
5.5mm Green Oval Acrylic Beads
5.5mm Blue Oval Acrylic Beads
5.5mm Pink Oval Acrylic Beads
0.3mm Tiger Tail
Stainless-Steel Scissor

Instructions on how to make the homemade beaded pen holder:
Step 1: Make the first part of the homemade beaded pen holder
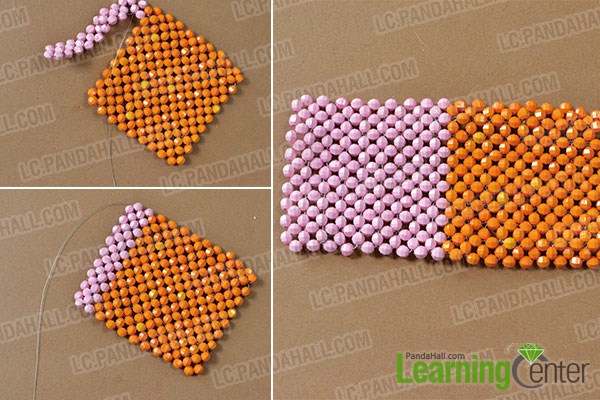
1st, cut a piece of 0.3mm tiger tail. Then, thread a 5.5mm yellow oval acrylic bead to it. Then, thread a 5.5mm orange oval acrylic bead to the two tiger tails respectively. Cross the two tiger tails through another 5.5mm orange oval acrylic bead;
2nd, thread a 5.5mm orange oval acrylic bead to the two tiger tails respectively. Then, cross the two tiger tails through another 5.5mm orange oval acrylic bead;
3rd, repeat the 2nd step 7 times;

4th, thread 3 5.5mm orange oval acrylic beads to the bottom tiger tail;
5th, cross the tiger tail through the 2 5.5mm orange oval acrylic beads and tighten (as shown in the picture);
6th, thread 2 5.5mm orange oval acrylic beads to the tiger tail. Then, cross the tiger tail through the 2 5.5mm orange oval acrylic beads and tighten (as shown in the picture);
7th, repeat the 6th step several times( for the 3rd time, please add a 5.5mm yellow oval acrylic bead and a 5.5mm orange oval acrylic bead) (as shown in the picture) ;

8th, refer to the above steps to make the third row;
9th, refer to the above steps to make the 4th row;
10th, refer to the above steps to make 5 more such rows (as shown in the picture).

Step 2: Make the second part of the homemade beaded pen holder
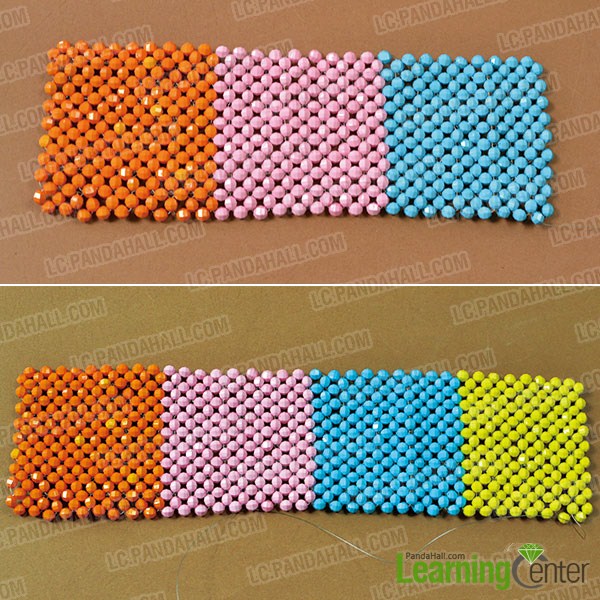
1st, refer to the first three steps in Step1 to make a pink bead row pattern (as shown in the picture);
2nd, combine the pink bead row pattern with the orange bead square by crossing the tiger tail through the orange beads. Then, refer to Step1 to make the second pink bead row pattern;
3rd, refer to above steps to make 7 more such pink bead row patterns (as shown in the picture);
4th, refer to the above steps to make a blue bead square;
5th, refer to the above steps to make a yellow bead square.
Step 3: Make the rest part of the homemade beaded pen holder
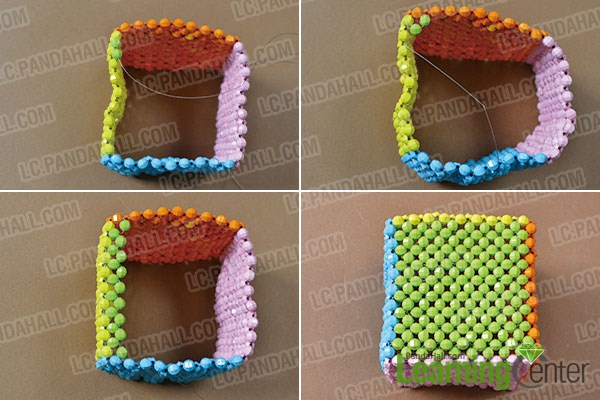
1st, combine the four squares into a cube by crossing the tiger tail through the yellow beads and the orange beads (as shown in the picture);

2nd, thread 2 5.5mm green oval acrylic bead to the tiger tail;
3rd, cross the tiger tail through the orange oval acrylic bead and the yellow oval acrylic bead in sequence;
4th, refer to the above steps to make a green bead row;
5th, refer to the above steps to make more such bead rows (as shown in the picture).
Here is the final look of the homemade beaded pen holder.
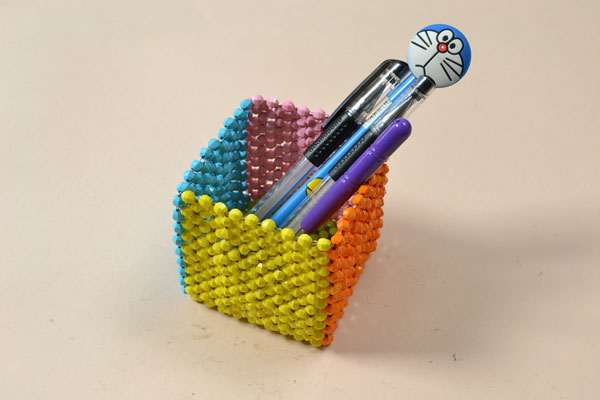
Do you like this homemade beaded pen holder? During the DIY process,you can modify the colored beads to fit your own unique style. Invest some time into this DIY project to make a homemade beaded pen holder the recipient will want to display. Have a nice try!