- Comments (0)
- Nov 24, 2015
How to Make a Pair of Bridal Chandelier Earrings with Pearl and Glass Beads
Summary: This is a bridal jewelry DIY project on making a pair of bridal pearl chandelier earrings. The detailed steps are listed below.

Are you searching for handmade bridal jewelry ideas? My tutorial is exactly what you want! With pearl beads and glass beads, I made a pair of elegant bridal chandelier earrings, which is a good choice for brides to wear on wedding day. Now follow my tutorial to see how to make the pearl drop earrings for wedding.
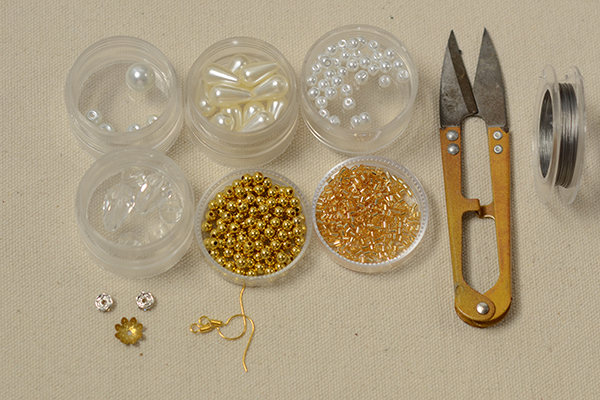
Supplies in making the pearl chandelier earrings with glass drop:
10mm White Pearl Beads
6mm White Pearl Beads
4mm White Pearl Beads
15x10mm Pearl Drop Beads
15x10mm Glass Drop Beads
8mm Transparent Glass Beads
3mm Gold Bead Spacers
2mm Yellow Bugle Beads
0.38mm Tiger Wire
Brass Rhinestone Bead Spacers
Tibetan Bead Cap
Gold Earring Hook
Scissors
Intructions on making the bridal pearl chandelier earrings:
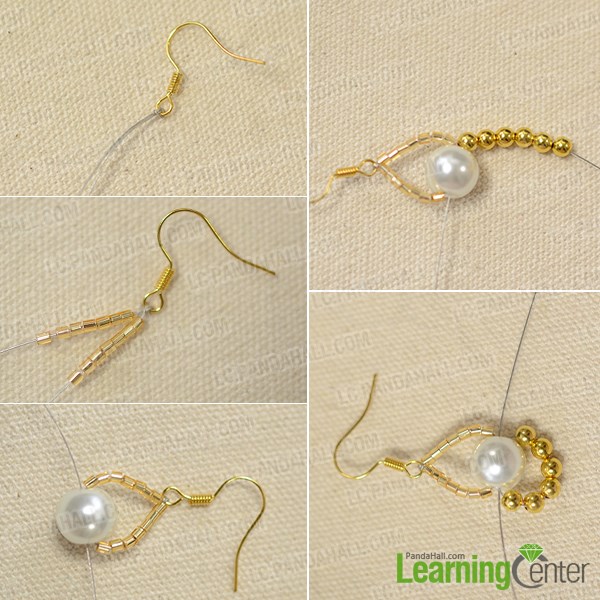
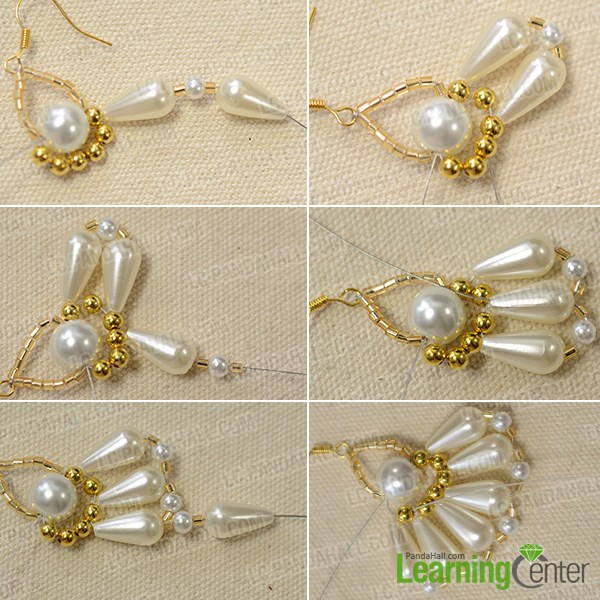
Step 1:Make the starting part of the chandelier earring
1st, snip off a piece of tiger wire (about 50cm), then fold it in halves and tie a knot to the gold earring hook and tighten;
2nd, separate the 2 wires by sliding 7 2mm yellow bugle beads on each, and them cross the wires through a 10mm white pearl bead;
3rd, slide 6 gold bead spacers to one wire, and thread the wire through the 10mm white pearl bead again and tighten up.
Step 2: Make the main part of the chandelier earring
1st, slide a 15x10mm white pearl drop bead, a 2mm yellow bugle bead, a 4mm white pearl bead, a 2mm yellow bugle bead and a white pearl drop bead again in order;
2nd, cross and tie the wire to the joint between the 2nd and the 3rd gold spacers as shown;
3rd, slide a 2mm yellow bugle bead, a 4mm white pearl bead, a 2mm yellow bugle bead and a white pearl drop bead again, then cross and tie the wire to the joint between the 3rd and 4th gold spacer;
4th, repeat above pattern and finish the main part of the chandelier earring.
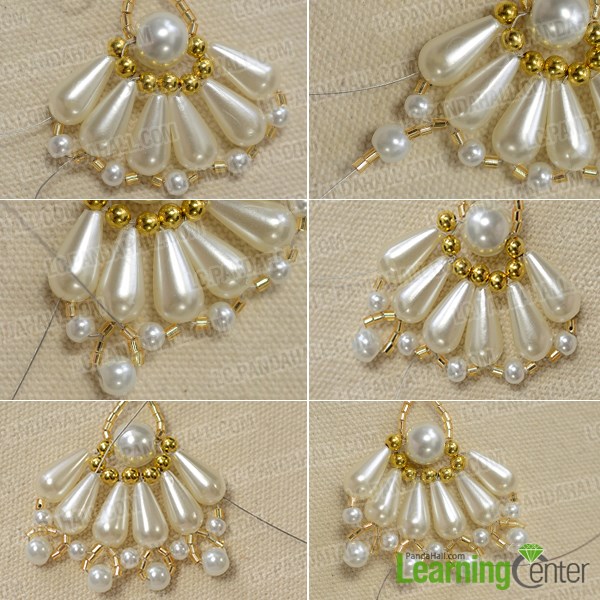
Step 3: Add out layer pearl ornaments
1st, thread the wire along the way to the 2nd yellow bugle bead on the left;
2nd, slide 2 2mm yellow bugle beads, a 6mm white pearl bead and 2 2mm bugle beads on the wire, and thread the wire through the next bugle bead on the primary layer and tighten;
3rd, thread the wire upward through along the drop pearl bead, the gold spacer and the next drop pearl bead again and then down to the bugle bead on the left;
4th, slide 2 2mm bugle beads, a 6mm white pearl and 2 yellow bugle beads again, and thread the wire through the next yellow bugle bead on the inner layer;
5th, repeat above beading pattern as for the right part, and finish the outer layer pearl ornaments.
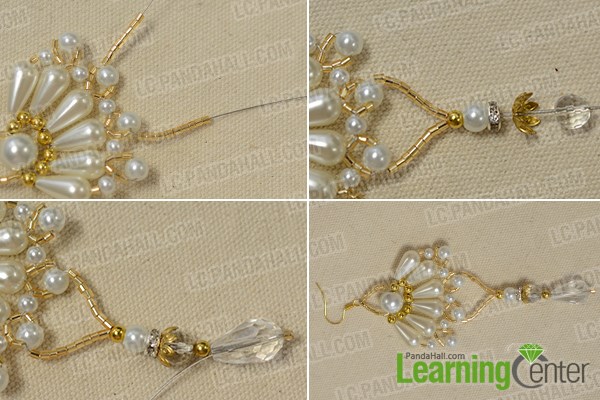
Step 4: Add a glass drop for the chandelier earring
1st, when you finish the step 3, the wires are separated through the 2nd and 3rd pearl bead, then slide 9 yellow bugle beads to each wire, and cross both wires through a gold bead spacer;
2nd, add a 6mm white pearl, a brass rhinestone spacer, a gold Tibetan bead cap, a 8mm glass bead, a gold spacer, a 15x10mm glass drop bead and finally a yellow bugle bead respectively;
3rd, tighten up the wire and trim off it to finish the pearl chandelier earring with glass drop.
Time for the final look! They are extremely elegant!
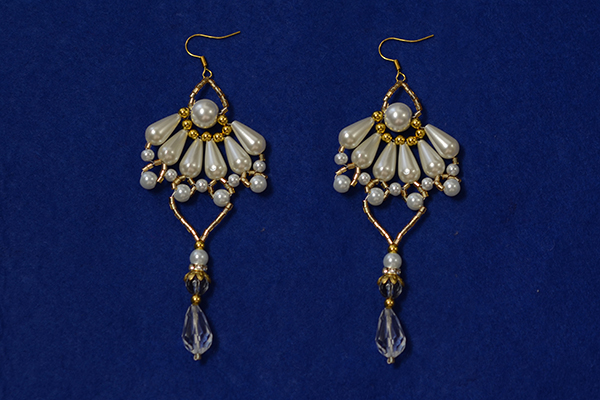
I finish this pair of bridal chandelier earrings within half an hour and I believe that you can also finish them in a short time by following the steps I listed. If you happen to be a bride-to-be, or if you have friend who is a bride-to-be, then it is highly suggested to make this pair of pearl chandelier earrings as gift for yourself or your friends!