- Comments (0)
- Sep 07, 2015
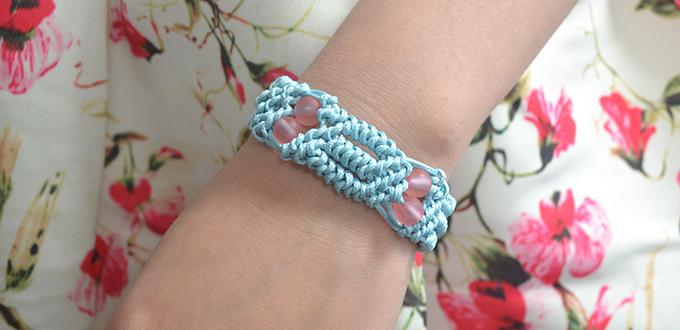
A Detailed Tutorial on Wax Cord Friendship Bracelet Making
Summary: Here I would like to introduce a video tutorial on making wax cord friendship bracelet.
Have you ever send a handmade bracelet to your friends? Today's jewelry making video aims at introducing you how to make a knotted wax cord friendship bracelet. With making some knots and stringing some acrylic beads step by step, you can make such a beautiful bracelet for your friends.
Music Credits: Depapepe - This Way
Materials and tools needed in the wax cord friendship bracelet:
1MM Blue Wax Cords
Round Transparent Acrylic Beads
Lighters
Scissor
Instructions in making the Wax Cord Friendship Bracelet:
Step 1: Make three pieces of wax cords of eight knots
1st, cut off 6 pieces of about 80cm 1mm blue wax cords;
2nd, pick up two pieces of the wax cords and put them together, then fix the wax cords of about 10cm from the top side with a clip;
3rd, put the right wax cord under the left wax cord, and use the right wax cord to bend a small loop across the left wax cord, then thread the left wax cord across the loop from the back side, and pull the two wires to make the first knot;
4th, repeat the steps to make another 7 knots on the wax cords, then we finish the first wax cord of eight knots;
5th, repeat the above steps to make another 2 wax cords of eight knots.
Step 2: Make the main part of the friendship bracelet
1st, put the three wax cords of eight knots side by side and fix the top side of the knots with a clip;
2nd, use every two close wax cords of the middle four to make two knots separately, then use every two close wax cords of the six to make a knot like the step one show, repeat the steps to use every two close wax cords of the middle four to make two knots separately ;
3rd, string a pink acrylic beads on the middle two wax cords separately, and repeat the steps to use every two close wax cords to make a knot, then use the middle four wax cords to make two knots;
4nd, use the middle two wax cord to make a knot, and use the middle four wax cords to make two knots, then make 5 knots on every two close wax cords;
5th, repeat the steps twice time to use the middle four wax cords to make two knots and use every two close wax cords to make a knot, then use the left two and right two wax cords to make a knot separately;
6th, string a pink acrylic bead on the middle two wax cords, then repeat the steps to use every two close wax cords to make a knot, use the middle four wax cords to make two knots, at last, you need to make 8 knots on every two close wax cords;
7th, cut off a piece of wax cord on the six knot chains on the both sides, and use a lighter to light the cut ends to fix them;
8th, now we left 3 wax cords on both sides, tie a knot on one cord and string 2 pink acrylic beads on another two wax cords on both sides and tie knots on the ends.
Step 3: Make the link part of the friendship bracelet
1st, combine the both sides of the wax cords' ends together, cut off a piece of about 20cm wax cord, and use the wax cord to tie a knot on the combined wax wires;
2nd, put the right wax cord on the back of the combined wax cords and put the left wax cordon the front, make sure there are two small loops on both sides, then thread the right wax cord across the right loop from back to front and thread the left wax cord across the left loop from back to front, pull the cords to make a knot;
3rd, repeat the steps to make another four knots, and tie a knot, then cut off the excessive cord and use the lighter to light the end to fix the link part.
This video tutorial on making the wax cord friendship bracelet is done. Simple wax cords and beads can make such a beautiful bracelet, although it's very cheap, it's meaningful for you and your friends. Your friendship will like this wax cord bracelet, remain forever and can never end.
For more free Pandahall beading video tutorials, just stay tuned!


