- Comments (6)
- May 06, 2015
Woven Bracelet Tutorial-How to Make a Light Cyan Woven Pearl Bead Bracelet
Summary: This article will show you a DIY summer bracelet and a woven bracelet tutorial on how to make a light cyan woven pearl bead bracelet.

Pearls are the gems of the ocean. DIY a summer pearl bracelet for yourself allows you to customize the bracelet to fit your own needs, taste and budget. Read on the following woven bracelet tutorial to learn how to easily make a light cyan woven pearl bead bracelet that showcases elegance and style.
Materials and tools needed in DIY the woven pearl bead bracelet:
8mm Light Cyan Pearl Beads
4mm Light Cyan Pearl Beads
2mm Seed Beads
0.3mm Tiger Tail
Brass Lobster Claw Clasp
Iron Jump Rings
Stainless-Steel Scissor
Needle Nose Plier

Instructions on how to make the woven pearl bead bracelet:
Step 1: Make the first pattern
1st, string 2 seed beads, an 8mm light cyan pearl bead and 14 seed beads in sequence;
2nd, make a loop by crossing the right piece of tiger tail through the two left seed beads, the pearl bead and the four seed bead on the right side of the pearl bead in sequence(as shown in the picture);
3rd, string a 4mm light cyan pearl bead, 5 seed beads and a 4mm light cyan pearl bead on the right tiger tail in sequence. Then, make a loop by crossing the tiger tail through the third seed bead beside the first 4mm light cyan pearl bead and the second 4mm light cyan pearl bead in sequence(as shown in the picture);
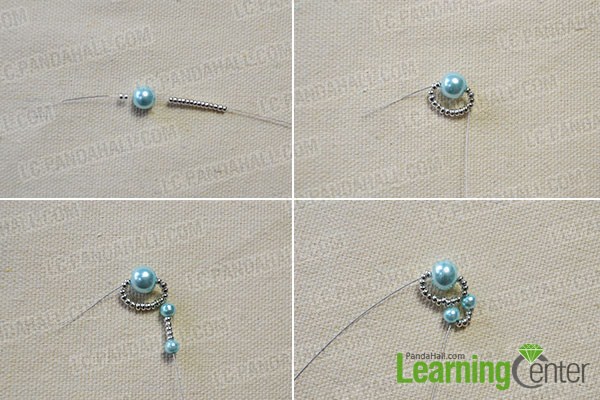
4th, string 5 seed beads and a 4mm light cyan pearl bead in sequence. Then, make a loop by crossing the tiger tail through the third seed bead next to the second 4mm pearl bead and the third 4mm pearl bead in sequence(as shown in the picture);
5th, cross the tiger tail through the three seed beads beside the third 4mm pearl bead;
6th, string a 4mm pearl bead and 5 seed beads. Then, make a loop by crossing the tiger tail through the third 4mm pearl bead, the 5 seed beads beside it and the first 4mm pearl bead in sequence (as shown in the picture);

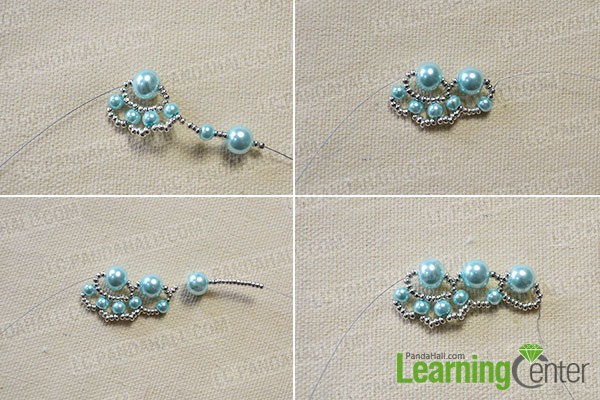
Step 2: Make the second pattern
1st, string 5 seed beads, a 4mm light cyan pearl bead, 3 seed beads, a 8mm light cyan pearl bead and 2 seed beads in sequence;
2nd, make a loop by crossing the tiger tail through the two seed beads on the left side of the fourth 4mm pearl bead (from left to right), the fourth 4mm pearl bead (from left to right),, the 5 seed beads, the fifth 4mm pearl bead (from left to right) and the 2 seed beads in sequence (as shown in the picture);
3rd, string 2 seed beads, an 8mm pearl bead and 14 seed beads in sequence;
4th, make a loop by crossing the tiger tail through the 4 seed beads beside the 8mm pearl bead added in the above step, the 8mm pearl bead added in the above step and the four seed beads on the right of the 8mm pearl bead(as shown in the picture);
Step 3: Continue to make the first pattern
1st, string a 4mm pearl bead, 5 seed beads and a 4mm pearl bead in sequence. Then, make a loop by crossing the tiger tail through the third seed bead beside the right 4mm pearl bead and the 4mm pearl bead beside it in sequence;
2nd, string 5 seed beads and a 4mm pearl bead in sequence;
3rd, make a loop by crossing the tiger tail through the third seed bead beside the second 4mm pearl bead (from right to left) and the next 4 seed beads(as shown in the picture);
4th, string a 4mm pearl bead and 5 seed beads in sequence. Then, make a loop by crossing the tiger tail through the third 4mm pearl bead (from right to left), the 5 seed beads beside it and the first 4mm pearl bead (from right to left) in sequence(as shown in the picture);
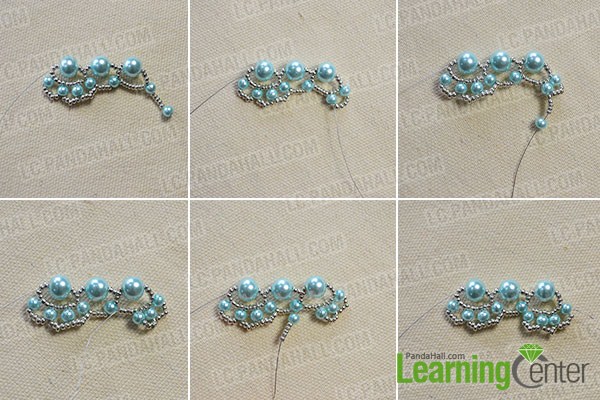
5th, string 5 seed beads, a 4mm light cyan pearl bead, 4 seed beads, a 8mm light cyan pearl bead and 2 seed beads in sequence to the right tiger tail;
6th, make a loop by crossing the right tiger tail through the two seed beads on the left side, the 9th 4mm pearl bead, the 5 seed beads, the 10th 4mm pearl bead (from left to right) and the 2 seed beads in sequence (as shown in the picture);
7th, refer to Step 1 to make the first pattern;
8th, refer to the Step 2 to make the second pattern, and then refer to Step 1 and Step 2 to make more such patterns until it fits your wrist.
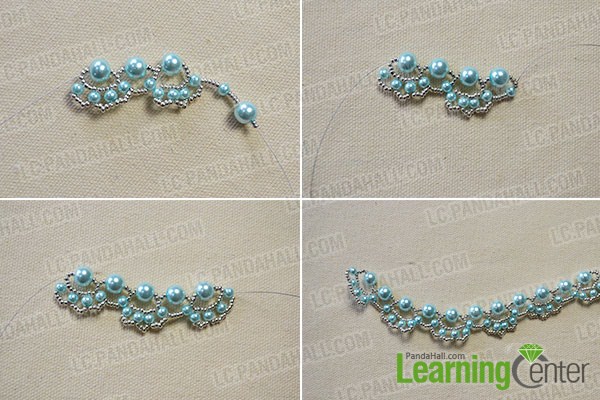
Step 4: Connect the two ends of the bracelet together
1st, combine the two ends with one iron jump ring respectively;
2nd, connect the two ends together through the two iron jump rings.

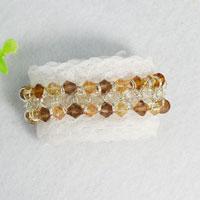
Here is the final look of the woven pearl bead bracelet.

There is nothing more elegant than a girl wearing this woven pearl bead bracelet around her wrist in summer. By referring to the above woven bracelet tutorial, you can also make a smaller bracelet for your daughters or friends' daughters. So, try to make one for yourself, friends or kids if you like it.

Comments (6)
-

-
Jun 04, 2015 at 02:31 AM rayha sehar
nice
-

Jun 07, 2015 at 06:44 PM Hong Cong rayha sehar
Thank you, you can try to make one.
-
-
-
Sep 09, 2015 at 02:43 PM Wanda Wood
I'm making this bracelet. I have a question on the pattern where it say to repeat step, which step do you start the repeat on?
-

Sep 09, 2015 at 05:55 PM Jenny Chan Wanda Wood
Hi, glad you are instersted in this bracelet. "Repeat the above steps" means repeating "Step 2: Make the second pattern",and continuing to make the first pattern, then making the second pattern...Hope it can help you. :)
-
-
-
Sep 10, 2015 at 04:55 AM Wanda Wood
Ok thanks very much. I'm making it for a wedding.
-
Sep 10, 2015 at 05:51 PM Jenny Chan Wanda Wood
My pleasure.If you have any other questions during the making process,you can also leave a comment. We'll try our best to help you. After you finish the bracelet,you can upload the picture of the finished bracelet to this page-->http://lc.pandahall.com/craft-ideas/p1.html to win coupons.
-


