- Comments (0)
- May 03, 2015
How to Make a Double Strand Chainmail Bracelet with Beads and Jump Rings
Summary: This article will show you an easy tutorial on how to make a double strand chainmail bracelet with beads and jump rings.

This DIY chainmail bracelet project is an ideal project for beginners or chainmail enthusiast. The project level is easy and it requires only some basic chain maille techniques and bead stringing techniques. Now, let's see how to make this double strand chainmail bracelet with beads and jump rings.
Materials and tools needed in DIY the chainmail bracelet:
Yellow Faceted Glass Beads
Brown Faceted Glass Beads
Orange Faceted Glass Beads
Iron Jump Rings
Iron Bead Tips
Slide Lock Clasps
0.3mm Tiger Tail
Stainless-Steel Scissor
Needle Nose Plier

Instructions on how to make the chainmail bracelet:
Step 1: Combine iron jump rings into a chain
1st, combine two 4mm jump rings with two 5mm jump rings;
2nd, combine another two 5mm jump rings with the two 5mm jump rings through another two 4mm jump rings (as shown in the picture);
3rd, repeat the above step to make more such patterns until it reaches a desired length (about the length of your wrist);

Step 2: Make two bead strands and combine them with the chain
1st, cut a piece of tiger tail and string brown beads, light yellow beads and orange beads to a length that fits your wrist (as shown in the picture);
2nd, repeat the above step to make another bead strand;
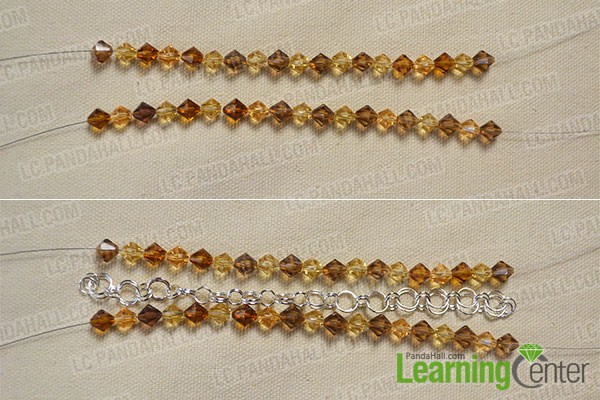
3rd, combine the two bead strands together with the jump ring chain by 4mm jump rings (as shown in the picture).

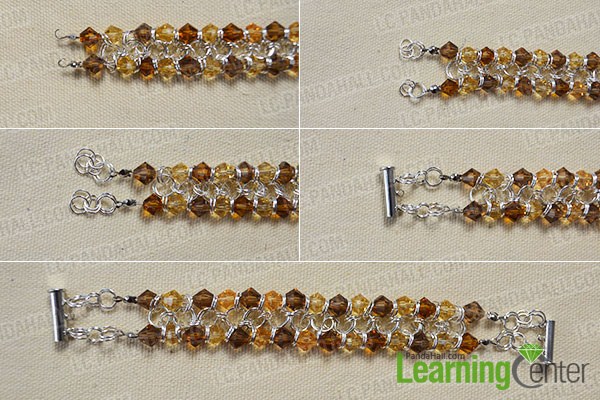
Step 3: Connect the two ends of the chainmail bracelet
1st, combine the two pieces of tiger tail (on the left side) with 2 iron bead tips;
2nd, combine two 5mm jump rings with two 4mm jump rings. Then, combine the 4 jump rings with an iron bead tip (as shown in the picture). Repeat this step to combine 4 jump rings with the other iron bead tip;
3rd, add another two 5mm jump rings through the two 4mm jump rings. Repeat this step for the other one;
4th, combine the left side of the bracelet with a slide lock clasp through the jump rings;
5th, repeat the above steps to combine the right side of the bracelet with a slide lock clasp.
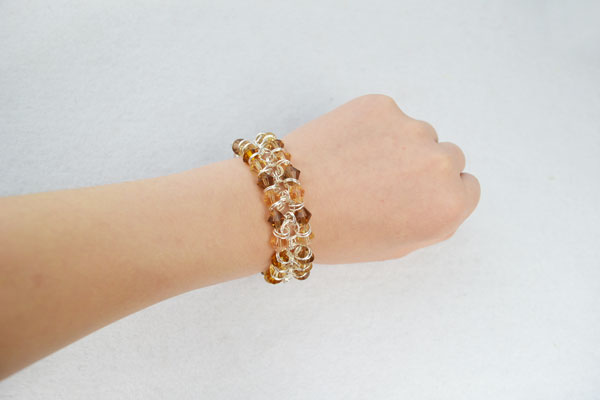
In the following picture, you can see the final look of this double strand chainmail bracelet.
What do you think of this DIY chain bracelet? During the DIY process, you can also change the colors of the beads or make the entire bracelet with a single color bead. After making your first chainmail bracelet, you'll gain confidence to make more complicated bracelets.