- Comments (1)
- Aug 20, 2014
Video Tutorial on How to Make a Chain Bracelet with Pearl Beads for Bridesmaids
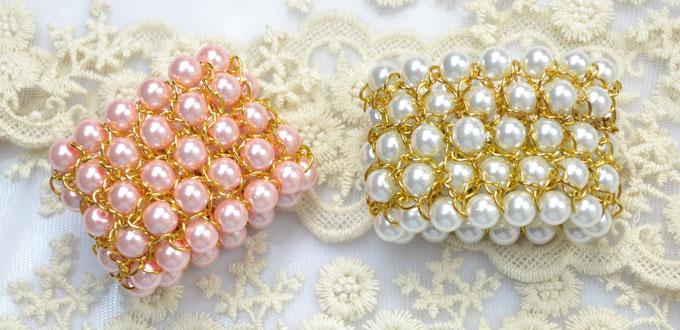
Summary: Create this stunning bracelet using sparkling golden chain and elegant pearls in a bead-woven pattern. This beautifully bracelet is fun to make and will be a super great accessory for bridesmaid.
Music credit: The Band Perry, "If I Die Yong"
Materials and tools list:
8mm Pink/White Glass Pearls
Twisted Chains
1mm Elastic Wire
Scissors
Wire Cutter Pliers
Round Nose Pliers
How to make chain bracelet with glass pearl beads?
Step1: Make the cardboard beading tool
a. Cut out a rectangle piece from an old cardboard box, measures about 15cm *30 cm;
b. Trim five slits evenly on the two 15cm sides, be sure those on the tops are aligning vertically with the ones at bottom.
Step2: Start to weave the pearl chain bracelet
a. Take the elastic wire, leave 3~5cm tail and arrange 5 strands on the cardboard. Tape one end for secure;
b. Prepare two strands of chain, about 50cm for each;
c. Place all things well on a desk. Then, from left to right, add one glass pearl on the 1st, 3rd and 5th wire;
d. Fold the chains in half and pass the 2nd and 4th wires through the center link. Now, from left two right, you can number the chains with 1,2,3 and 4;
e. Take the 1st wire, thread it through the next 2nd link on NO.1 & 2 chains. Here, you need to pay attention to the directions of chain links. Repeat the same action with the 3rd wire and NO.3 & 4 chains;
f. Add one glass pearl on the 2nd wire, then thread it through the next 2nd link on NO.1 & 2 chain strands. Now, we’ll get the pearl surrounded by 4 chain segments. Similarly, add one glass pearl on the 4th wire and then thread it through the next 2nd link on NO.3 & 4 chains;
g. Add one glass pearl on the 1st wire, and then thread it through the next 2nd link on NO.1 chain. Next, add one glass pearl on the 3rd wire, and then thread it through the next 2nd link on NO.2 &3 chains. Finally, add one glass pearl on the 5th wire, and then thread it through the next 2nd link on NO.4 chain;
h. Repeat the “f” and “g” for a desired bracelet length.
Step3: Knot the wires
a. End the bracelet with a pattern in “f”;
b. Remove the excess chain links with pliers;
c. Take the wires from the splits, and then tie surgeon knots to connect the beginning and ending wire parts;
d. Try another combination by using the white glass pearls;
e. Leave 3mm-7mm at ends and cut off any other excess wires. Then, turn the inside out carefully.
Tada! Now you have had two of them finished! So amazing, right? Once you get the hang of today’s chain and pearl cuff bracelet, you also take the first step towards a special and personalized wedding ceremony!
If you like Pandahall videos, PLZ Subscribe to Receive More!
Comments (1)
-

-
Oct 22, 2014 at 01:49 PM Carolyn Byrnes
Super, exactly what I was looking for. Have you considered using the left over open links from cutting the chain to connect the two ends, in addition to the knots, which I glued.


