- Comments (0)
- Mar 24, 2014
New Design on Making Soutache Bead Embroidery Earrings with Nylon Threads and Green Beads
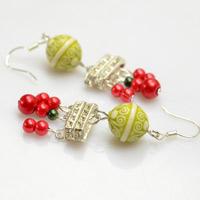
Summary: This tutorial shows soutache bead embroidery - a new design in jewelry making. Let’s learn how to make a pair of soutache earrings. Very funny!

This pair of bead embroidery earrings are threads stitched together, highlighted with wonderful beads. Sew yourself through a newly poupular technique of making jewelry: soutache and bead embroidery. Let‘s combine soft braids with beads to make a snail earrings now!
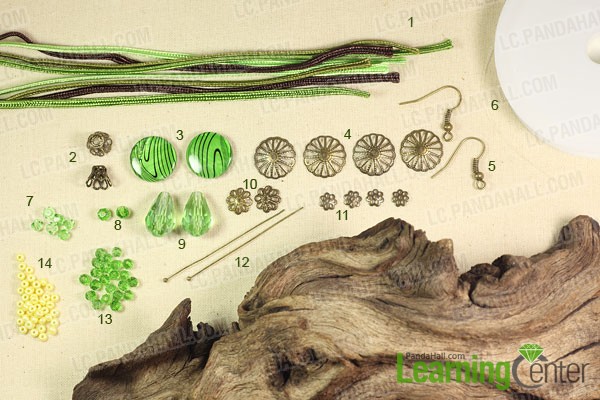
Materials needed in DIY bead embroidery earrings
8pcs. approx. 40cm Nylon Threads
2pcs. Basket Bead Caps, bronze color
2pcs. Shell Beads, green color
4pcs. Bead Caps, bronze color
2pcs. Earring hooks, bronze color
Several meters Nylon Wire, clear
6pcs. Bicone Glass Beads, green
2pcs. Facetted Glass Beads, green
2pcs. Dropshaped Facetted Glass Beads, green
2pcs. Flower Bead Caps, bronze color
4pcs. Mini Flower Bead Caps, bronze color
2pcs. Ball Head Pins, bronze color
22pcs. Facetted Beads
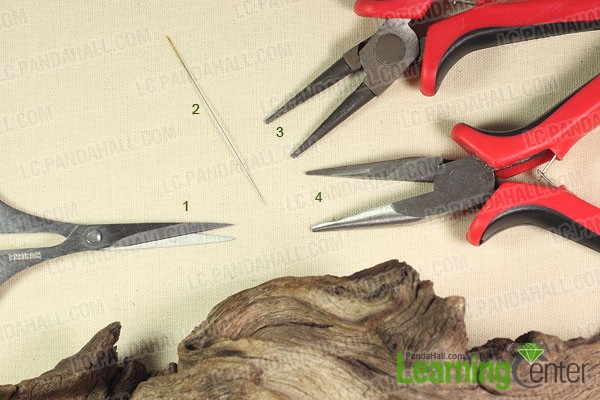
Tools for making soutache and bead embroidery earrings
Scissors
Beading Needle
Round Nose Plier
Flat Nose Plier
How to make a pair of soutache earrings ?
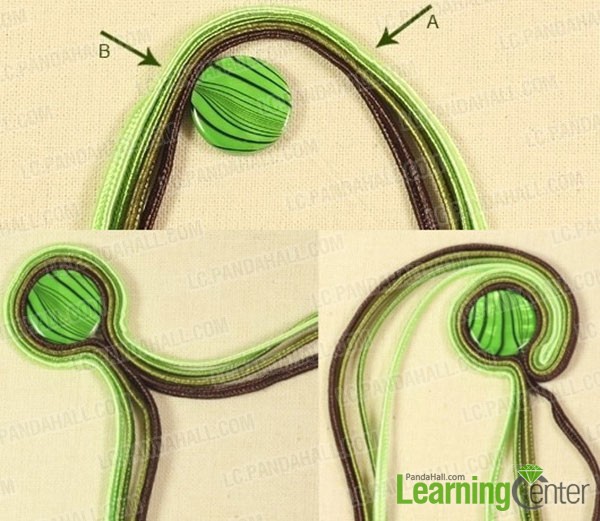
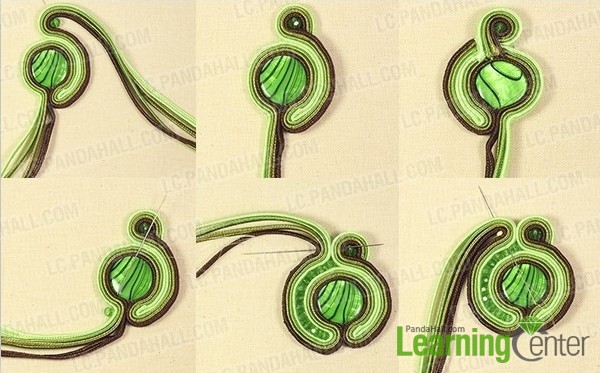
Step1: Stitch around a shell bead
(Note: Through the whole tutorial you always need to sew the threads together and position and fix them. Always stitch into the middle of the thread to sew invisible and effective.)
1st, grab one dark brown, one olive green, one green and one light green nylon thread and lay them on top of each other;
2nd, now make sure you start sewing the flat nylon threads together at about one third from the right (Arrow A on the picture);
3rd, ly the threads around the shell bead to see how far you have to sew to reach the beadhole of the shell bead (Arrow B on picture). Now string the shell bead onto the clear nylon thread and stitch back through point A o fix the bead;
4th, from this point stitch through all 8 strands and from the left side back through the bead to have fixed it from both sides. From the top of the bead sew the left side threads like before the right ones to hold the 4 threads together. After reaching again the bottom of the piece stitch back throug all 8 threads;
5th, now bend up the right sides threads and fix them by sewing them to the 4 strands lying around the bead. Go on until you’ve reached the top.
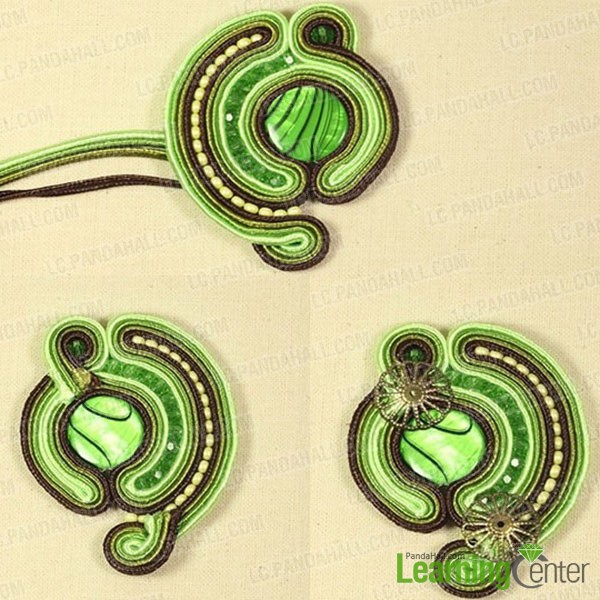
Step2: Stitch around glass beads
1st, now bend the four strands down, add a bead nr. 8 and stitch together the four strands a few centimeters;
2nd, bend the threads onto the back of the jewelry piece;
3rd, fix it carefully by sewing it a few times on to the other threads and cut the ends;
4th, stitch back through the shell bead to get back down and there start sewing on 11 beads. By adding the beads between the threads and fix them in place you automatically sew the four threads together. Go on like this until all 11 beads are in place;
5th, when you’ve reached the top, again sew all 8 threads together to secure them in place;
6th, stitch back to start with the seed beads nr. 14. Since the size of each bead may vary a bit, you’re going to need more or less beads.
Step3: Finish the snail body stitching
1st, sew them on like you did before until you reach the bottom of your jewelry piece. Again bend the threads on to the back of your creation, form a nice loop, but this time without a bead;
2nd, sew the threads again carefully on the other threads and cut the ends;
3rd, take two bead caps nr. 4 and sew them over the cut ends of the threads to cover them.
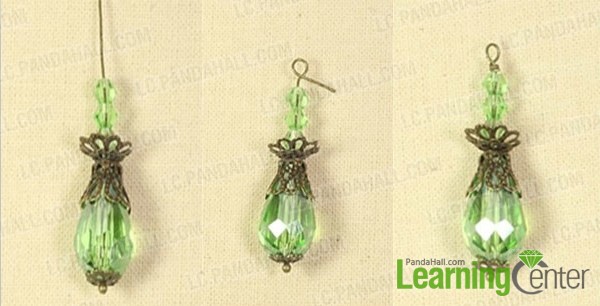
Step4: Make pendant for the snail earrings
1st, now create the little pendant fort he bottom by stringing one pc. nr. 11, 9, 2, 11, 10 and three pcs. of nr. 7 on one ballhead pin;
2nd, form a loop as shown on the picture with the round nose plier;
3rd, grab the loop with the round nose plier and the end of the pin with the flat nose plier. Now bend the end piece around the pin to reach a result like shown on the picture.
Finally sew on the little pendant to the bottom and the earring hook to the top of the jewelry piece. TADA!
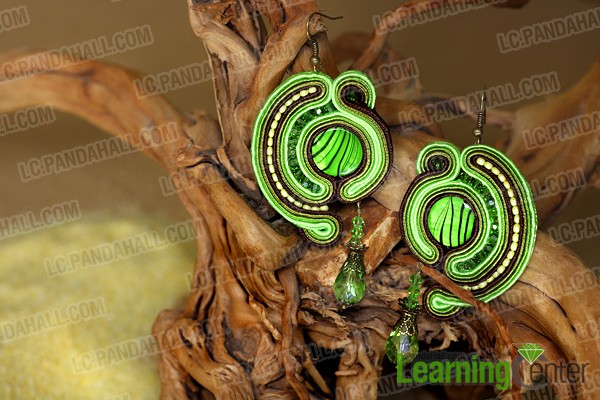
Wonderful bead embroidery earrings! You’ve crafted a unique treasure hiding its secrets in curved lines and plain but so glamorous apperance. It looks like snail, so I name it snail earrings.You can wear it as a real highlight on normal days or for big events. Enjoy this lovely technique where your fantasy is able to bloom and spread.