- Comments (0)
- Mar 10, 2014
How to Make Easter Bunny Hair Clip for Little Girls
Summary: Looking for Easter bunny hair clips for the coming holiday? We’ve got a cute idea here.

What hair accessories should a baby wear in the coming Easter? Well, an adorable DIY Easter bunny hair clip should be a cool idea, hah? This tutorial aims to tell you an interesting way on how to make an Easter bunny hair clip for baby girls. Within just a few simple materials, you can finish this fancy felt barrette.
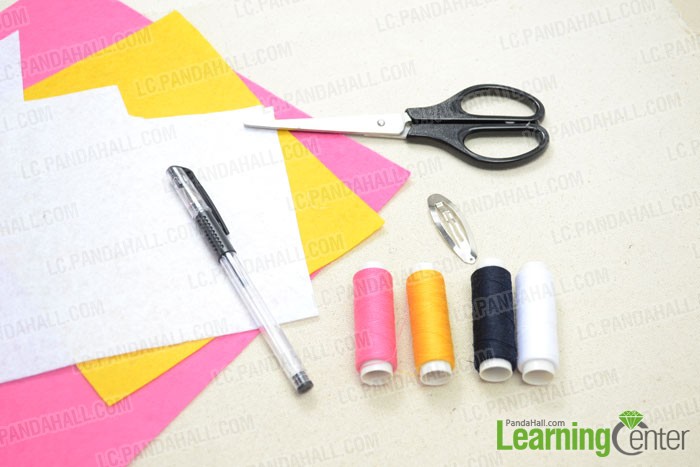
Materials and tools needed for making Easter bunny hair clip:
Pink 0.3mm Nylon threads
Yellow 0.3mm Nylon threads
Black 0.3mm Nylon threads
White 0.3mm Nylon threads
Sewing Needle
Felt sheet
Hair clip findings
Scissors
Instructions on making Easter bunny hair clip:
Step 1: prepare the front side of bunny
1st, print out the bunny pattern and tailor the pieces on felt sheet; each bunny should have 2 pieces for front and back sides;
2nd, cut out circular white felt piece as bunny’s tail and sew it to a bunny’s bottom part;
3rd, use black thread to make eyes.

Step 2: complete the felt bunny
1st, use whip stitch to sew an ear to the back piece of bunny;
2nd, evenly align the front piece with back one and sew them together to make a full bunny.

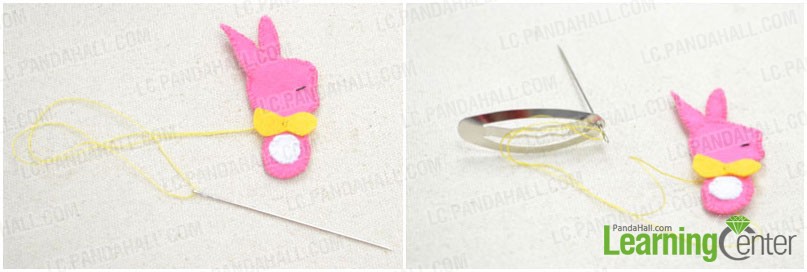
Step 3: sew the bunny to clip
1st, cut a butterfly bow and sew it to the middle of bunny’s neck;
2nd, attach bunny’s back to hair clip and beware of poking thread through front side.
Now, here we have successfully finished this lovely Easter bunny hair clip. I bet your little girls will be fond of this little stuff very much. You can also teach them how to DIY it by following the tutorial to make Easter hair clip. Enjoy crafting with kids!