- Comments (0)
- Jan 24, 2014
Free Tutorial on Making a Blonde Doll with Seed Beads and Satin Ribbons
Summary: Here demonstrates a lovely blonde doll pattern! this tutorial will show you the details about how to make this felt doll pattern.

DIY felt doll is an interesting but time-consuming thing; this “blonde girl” doll just right belongs to this kind. if you made felt doll before, you can understand the great joy that overwhelms me after completing this doll. Now it’s a good chance for you to try this doll pattern.
Necessities for this DIY felt doll:
1mm black nylon thread
2mm white nylon thread
Blue satin ribbon
8mm dark blue wood beads
8mm blue cat eye beads
4mm colorful seed beads
Iron pin back
Yellow nylon sewing thread
Black nylon sewing thread
Creamy nylon sewing thread
Pink sewing thread
Yellow felt
Creamy felt
Glue gun
Needle
Scissors

Instructions on this “blonde girl” felt doll pattern:
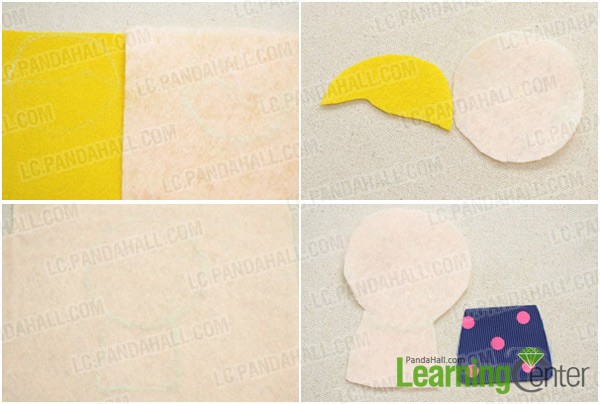
Step 1: Prepare felt components of the doll
1st, outline doll’s head on creamy felt and doll’s hair on yellow felt;
2nd, cut out head and hair components;
3rd, draw whole body on creamy felt;
4th, cut out the body component first and then against this body tailor out the ribbon dress.
Step 2: Finish the doll’s head
1st, sew blanket stitches with needle and yellow thread to combine head and hair together;
2nd, sew blue cat eyes onto head, imitating doll’s blue eyes;
3rd, sew up doll’s eyelash with black thread;
4th, sew pink seed beads beneath the eyes, and the doll’s lip is done.

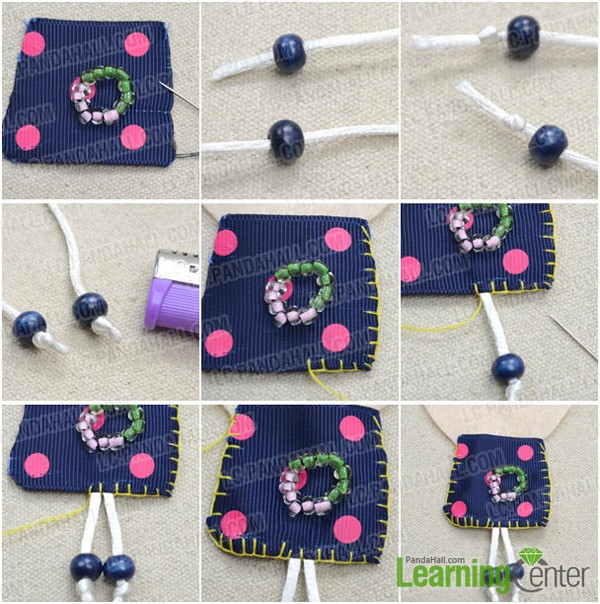
Step 3: Finish the doll’s body
1st, sew seed beads onto ribbon dress and this circle pattern becomes a pocket;
2nd, cut 2 pieces of white nylon thread that both measure about 20cm;
3rd, slide blue wood beads onto threads and knot at one end, and the doll’s legs are done;
4th, connect ribbon dress onto body component by sewing blanket stitches with yellow thread;
5th, when sewing bottom edges add “legs”;
6th, finish the edge sewing.
Step 4: Make doll’s braids
1st, cut 48 pieces of yellow threads that measure about 30cm long;
2nd, knot them together at one end;
3rd, do triple braiding;
4th, cut a piece of black thread and make a wrapped knot at the end of braiding;
5th, cut off excess threads and melt the ends;
6th, repeat to make another braid and hot glue them onto body component.

Step 5: Finish the doll pattern
1st, hot glue the hair edge of the head onto body component;
2nd, sew up the left face edge;
3rd, stuff some cotton into body part;
4th, sew up the jaw;
5th, stuff cotton into head part;
6th, sew the right face edge;
7th, cut off excess sewing thread;
8th, hot glue brooch finding onto the doll’s back.

Finally the DIY felt doll looks like this:

Wonderful felt doll pattern is done! As you can see, DIY felt doll is quite fascinating, and you need spend much time on sewing and braiding in this tutorial. Be patient and you will craft this lovely doll.