- Comments (0)
- Jan 02, 2014
Free Keychain Project with Typical Green Bead Alligator Pattern
Summary: I display a new seed bead pattern in this tutorial, that is, a lively green alligator! Hope you can enjoy the fun animal keychain.

This seed bead alligator pattern is quite suitable for kids to handcraft. In this project, there is just repetition of right angle weaving, so it is acceptable to children; in addition, animal patterns are always children’s favorites. Therefore, I believe this seed bead alligator will be a success.
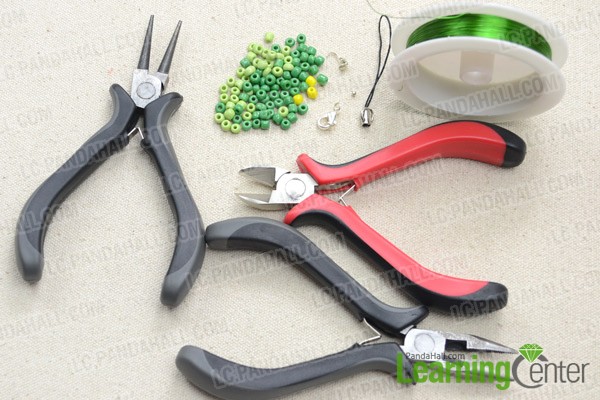
Necessities for beaded alligator keychain :
4mm dark green opaque seed beads
4mm light green opaque seed beads
4mm yellow opaque seed beads
0.3mm green brass wire
Silvery bead tip
Silvery lobster claw
Crimp bead
Cord loop
Round nose plier
Flat nose plier
Wire cutter
Instructions on how to make a alligator keychain with seed beads:
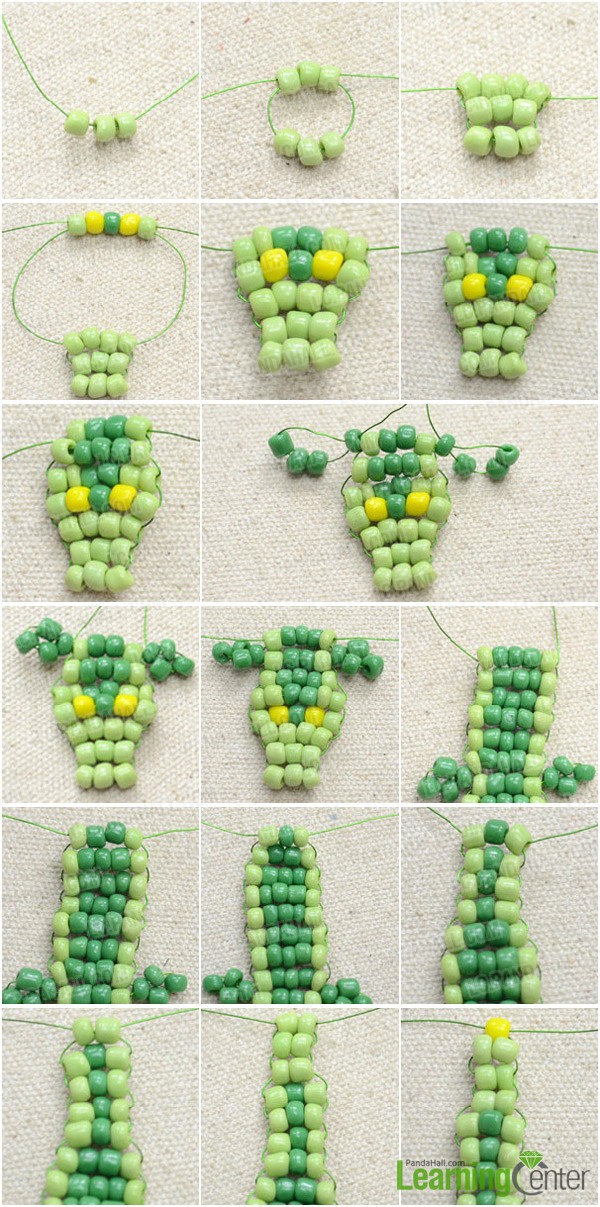
Step 1: Weave alligator’s body
1st, cut a 1.5m length of green brass wire and string 3 light green seed beads;
2nd, cross both ends through another 3 light green beads;
3rd, tighten wire and cross both ends through another 4 beads;
4th, tighten wire and cross both ends through 1 light green, 1 yellow, 1 dark green, 1 yellow and 1 light green bead in order;
5th, tighten wire, , string the 5th row and the alligator’s head is done;
6th, the 6th row needs 1 light green bead, 3 dark green beads and 1 light green bead;
7th, the 7th row includes 1 light green bead, 2 dark green beads and 1 light green bead;
8th, add 4 dark green beads onto each end, and back them through the first bead strung;
9th, tighten both ends;
10th, 8th row is same with the 7th row;
11th, from 9th to 14th row, beading order is 1 light green,3 dark green and 1 light green;
12th, 15th row is another copy of the 7th row;
13th, 16th row is composed of 1 light green, 1dark green and 1 light green bead;
14th, repeat 16th row 3 times;
15th, 20th row contains only 2 light green beads and then repeat twice;
16th, finally cross both ends through a yellow bead.
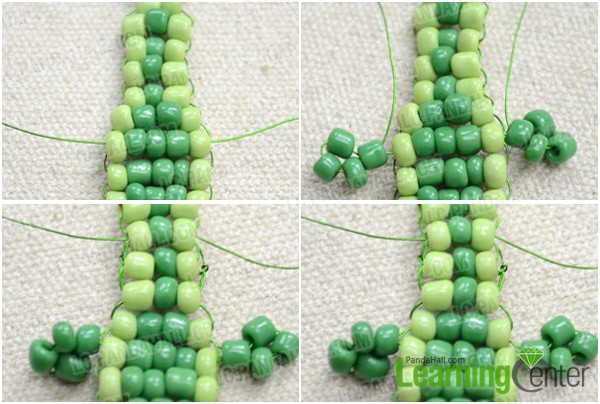
Step 2: Complement a pair of claws
1st, cut a 20cm length of brass wire and string it through the 13th row;
2nd, add 4 dark green beads onto each end and back them through the first beads strung;
3rd, cross both ends through the 14th, 15th, and 16th row;
4th, tie both ends and cut off excess wire.
Step 3: Attach key loop
1st, from the last yellow bead, thread both ends through a bead tip;
2nd, add a crimp bead and crimp it down;
3rd, cut off excess wire and close the bead tip;
4th, attach lobster claw and loop cord to it.

The finished beaded alligator keychain looks like this:
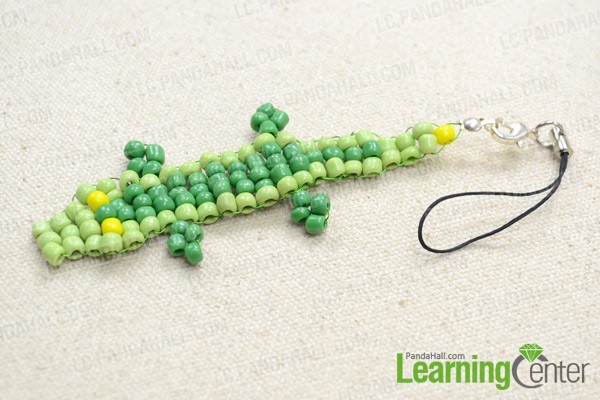
The seed bead alligator pattern is done. Actually step 2 is a way to retrieve the alligator who lost its back claws. While I am doing this beaded pattern, I got distracted by dialoguing with my workmate. Therefore I forgot the alligator’s back claws.