- Comments (0)
- Nov 10, 2013
How to Make Braided Bead Bracelet - Delicate Braided Bracelet DIY Project
Summary: Simple 3 steps to make a pretty braided bead bracelet; this tut is to teach you how to make braided bead bracelet with elegant blue threads and chic rhinestone beads.

You can create the DIY braided bead bracelet with some materials that were already on hand - threads and rhinestones that are quite accessible and cheap to get. With these simple materials, you will make this braided bracelet with dainty rhinestone adorned.
Supplies for DIY braided bracelet:
1mm blue nylon thread
0.5mm silvery brass wire
5mm Montee rhinestones beads
Pearl sequins
Tibetan style cone beads
Lobster claw
Jump rings
Round nose plier
Wire cutter
Glue gun
Scissors
Tape

How to make braided bead bracelet
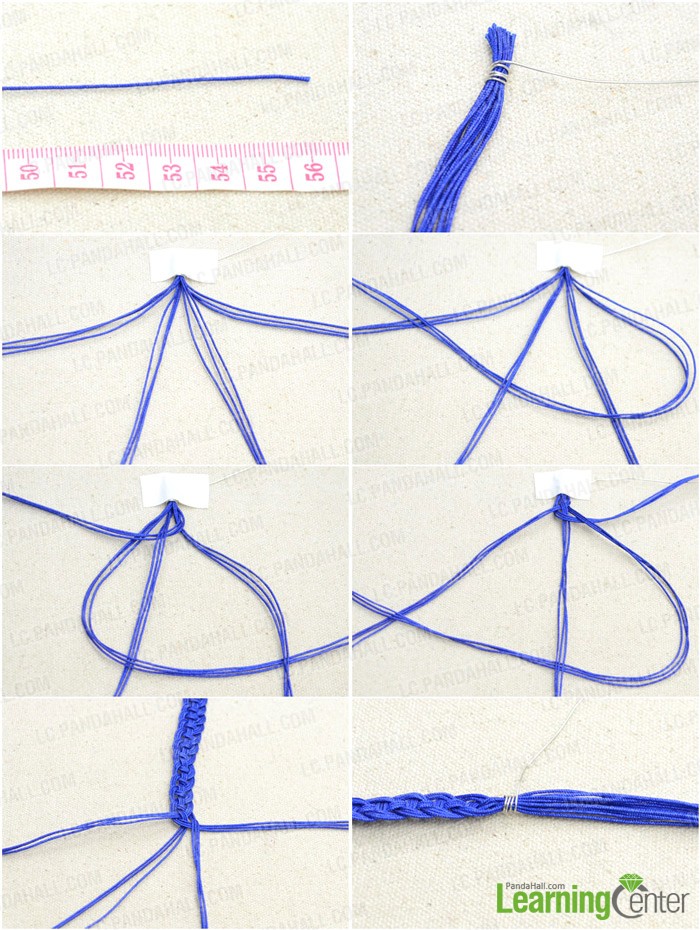
Step 1: Braid 4-strand bracelet
1st, pick 12 strands of blue nylon thread, and each measures about 56cm;
2nd, align them together and bind them up with 0.5mm brass wire;
3rd, use tape to stick the bundle to working table, and separate strands into 4 groups;
4th, pass rightmost group over, under and over the adjoining groups in order;
5th, pass second group (count from leftmost) over and under the adjoining groups;
6th, pass second group (count from rightmost) under and over the adjoining groups;
7th, repeat 5th and 6th processes, and braid the bracelet to the length you desire;
8th, bind the other end of strands with brass wire.
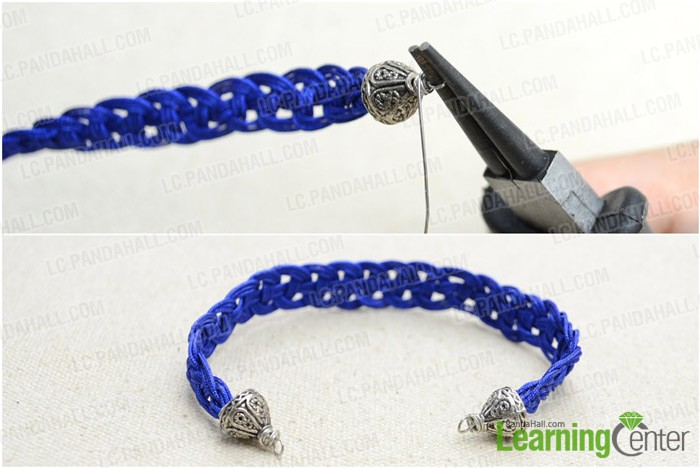
Step 2: Finish braided bracelet
1st, add cone bead onto wire and make a wrapped loop;
2nd, similarly handle the other end.
Step 3: Adorn bracelet with beads
1st, glue beads and sequins to braided bracelet;
2nd, attach clasp and jump ring to bracelet.

The final look of braided bracelet is like this:
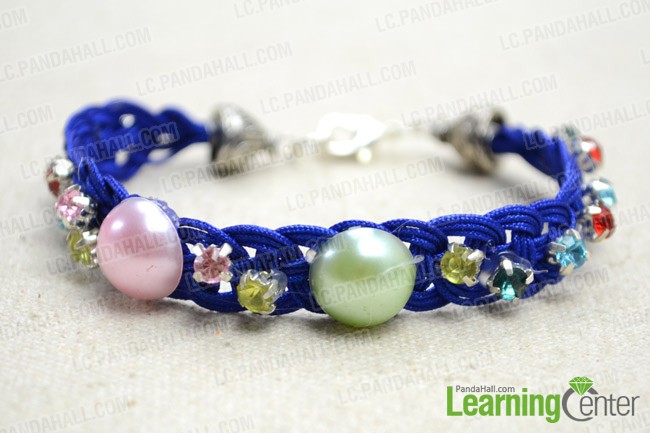
Tada! This DIY braided bead bracelet is definitely a lovely idea! Making our own bracelets will bring more variety to accessories than anything bought could ever add.