- Comments (1)
- Nov 08, 2013
Make a Beaded Frog Phone Charm with Detailed Diagram and Instructions
Summary: Here you’ll learn how to make a cute beaded frog phone charm. A clear beading diagram and several clear pictures are included to help your practice! It’s really a challenging project!

This tutorial is gonna show you how I made a cute frog phone charm by using round, oval and faceted round beads. Though it is not suitable for all craft learners, I still hope you may love it and would like to have a try! Here, besides the vital beading diagram, I also photographed some easily-confused procedures. Now, let's check how to make the bead frog!
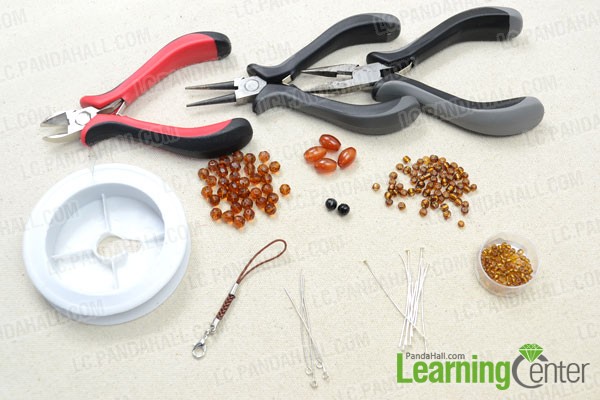
Supplies needed for making the frog phone charm:
Oval Gemstone Beads
6mm Faceted Round Gemstone Beads
6mm Faceted round Glass Beads
4mm Round Seed Beads
3mm Round Seed Beads
Headpins
Eyepins
Cord Loop
0.3mm Tiger Tail Wire
Side Cutting Pliers
Round Nose Pliers
Wire Cutters Pliers
How to start the cute frog phone charm?
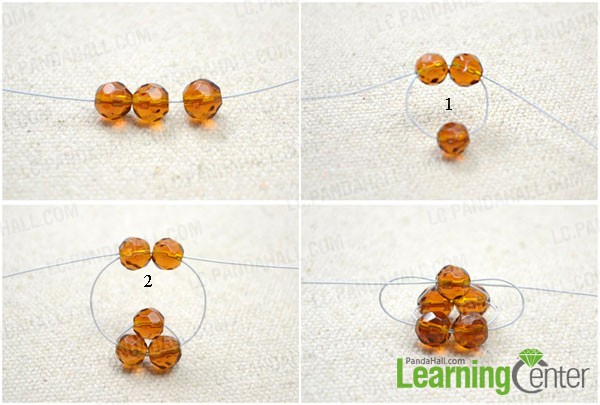
Step 1: Read the diagram carefully and make the first two beaded loops
1st, read the diagram carefully:
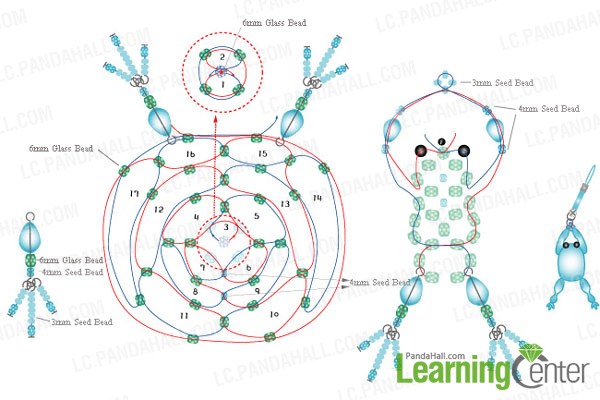
2nd, cut a 100cm piece of tiger tail wire;
3rd, slide three 6mm round glass beads onto the center of wire, and then take the wire to go back through the last two beads for the first beaded loop;
4th, cross two ends through another two 6mm round glass beads;
5th, thread the two ends through the top 6mm round glass bead;
6th, tighten the wires and you'll get the 1st and 2nd beaded loop in the diagram.
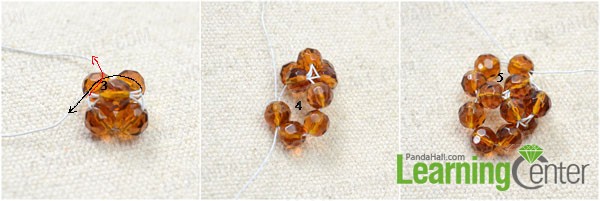
Step 2: Make the 3rd~17th loops according to diagram
1st, put the beaded part on a flat. Thread the left wire end through the bead on top left corner from left to right, and then the right wire end through the two beads in 2nd loop from right to left;
2nd, in the rest part, add beads on two wire ends as diagram shows to make the loop 4, 5 , 6....
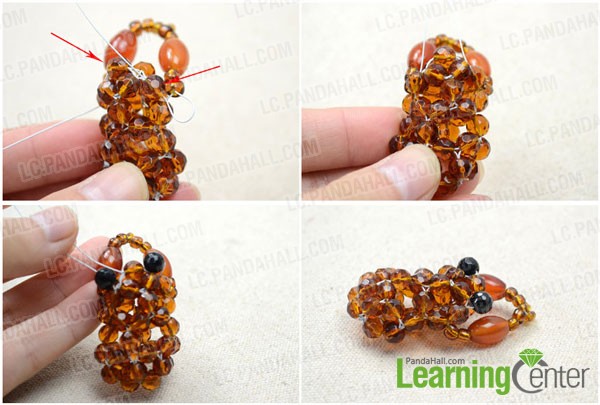
Step 3: Add two eyes and two arms for the beaded frog
1st, turn attention to the final 18th loop that consist of six 6mm round glass beads(not marked on the diagram), weave the two ends to make them exit at two upper beads (where the two arrows point);
2nd, thread the wires through three adjacent glass beads, then add the proper beads for making two arms. Finally, pull two wires firmly;
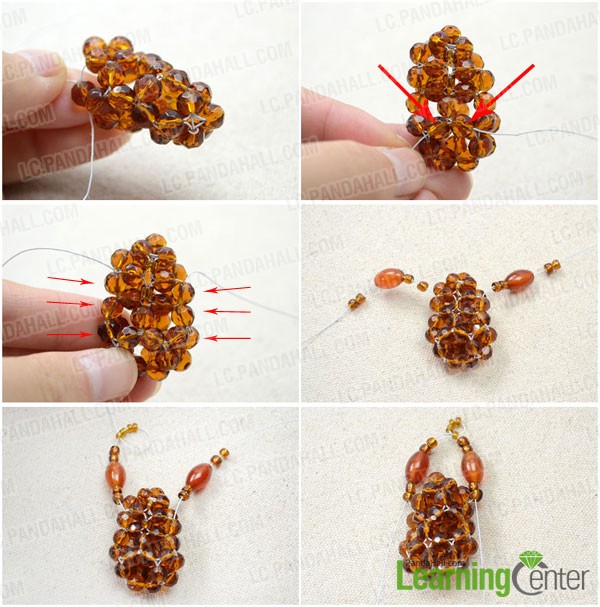
3rd, continually thread the wires through one 6mm glass bead, then add two 6mm black gemstone beads as eyes;
4th, cross two wires through the existed 6mm glass bead between two newly added "eye" beads! Then weave the wires through beads to make them stuck stably and the main body part of your frog is done!
Step 4: Make the two "legs" for the beaded frog
1st, take the eyepins and headpins, then add on beads as diagram shows;
2nd, make simple loop at top of each branch by using cutters and round nose pliers;
3rd, assemble the apart units into a "leg";
4th, squeeze the simple loops to make the toes be more firm;
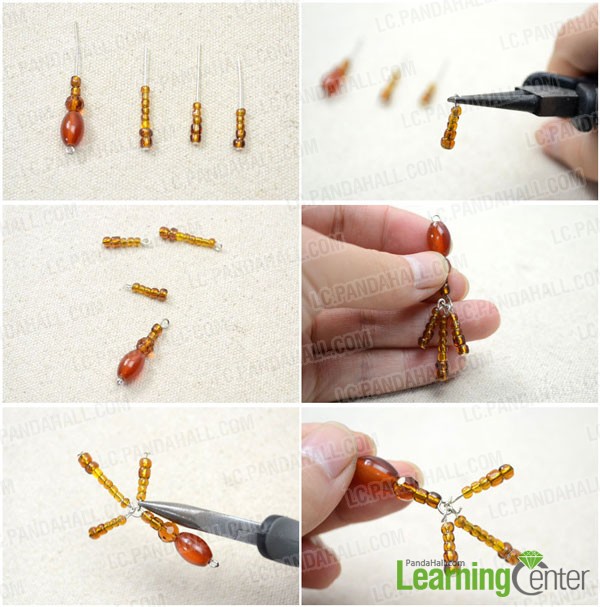
5th, make another "leg" in same way;
6th, attach two legs at the right locations in diagram.

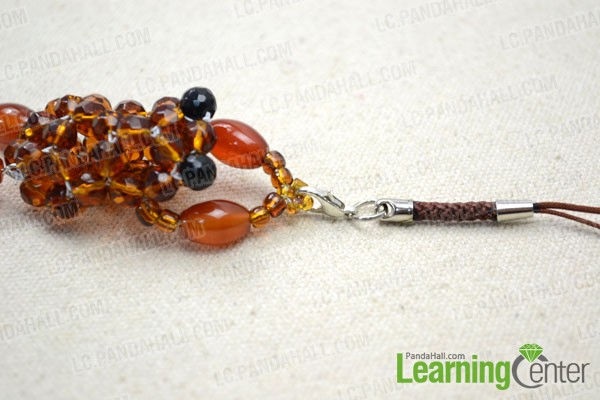
Step 5: Attach the cord loop
Open the lobster clasp and hoop the beaded loop between two arms!
It's soooooo cute, right?

No matter being hanged as a cute phone charm or cool decorations on bags, it definitely makes a statement. So, for each craft fancier, you should really be proud of yourself for fulfilling it. Otherwise, if you encounter any problem, just feel free to ask questions! In the coming months, we'll post more tutorials about how to make bead animals. Just stay tuned!

Comments (1)
-

-
Feb 14, 2014 at 05:14 AM Cathleen Reese
Love the froggie!


