- Comments (3)
- Nov 07, 2013
Making Right Angle Weave Stitch Bracelet with Turquoise Beads and Glass Bicones
Summary: I will show you how to make a sparkling right angle weave bracelet with glass bicone beads and turquoise beads. Click tutorial to learn the details about the stitch.

Right angle weave stitch is such a popular and simple technique that is often utilized while making diversified beaded bracelets. For this tutorial, I make a quite unusual combination of turquoise, glass bicones and golden metal beads which proves to be perfect in the final result.
The necessities for this right angle stitch beaded bracelet:
8mm turquoise beads
4mm turquoise beads
8mm pink glass bicone beads
8mm golden plated bicone glass beads
4mm golden metal beads
0.3mm tiger tail wire
Jump rings
Lobster claw
Flat nose plier
Round nose plier
Wire cutter

How to make right angle weave stitch bracelet:
Step 1: Make base bracelet with turquoise and glass bicone
1st, cut a 80cm length of tiger tail wire, thread it through a jump ring and cross both end through a large turquoise bead;
2nd, add 2 small turquoise beads to both end and cross them through a pink glass bicone;
3rd, tighten wire, add 2 small turquoise beads to both ends and cross them through a large turquoise bead;
4th, use the right angle weave stitch to repeat the beading process;
5th, place pink glass bicone onto 11th position and change the alternate order from there;
6th, after finishing 18th bead, the base bracelet is long enough;
7th, thread right end through a jump ring and back through the last strung turquoise bead, tighten wire.

Step 2: Add wave pattern with golden beads
1st, add beads to both ends in the order: 3 golden metal beads, 1 golden acrylic bicone and another 2 metal beads;
2nd, thread wire through the small turquoise bead and large turquoise bead at 3rd position;
3rd, tighten both ends and continue beading;
4th, stop at the 11th position, add 1 metal bead, 1 acrylic bicone and 1 metal in order to both ends, and thread wire through small turquoise and large one at 12th position;
5th, back to previous beading way (1st-2nd );
6th, at last position, needless to cross through the last turquoise bead, just tie a firm knot there and back through wire ends through previous beads;
7th, cut off excess wire ends;
8th, attach a lobster claw to one jump ring at the bracelet.
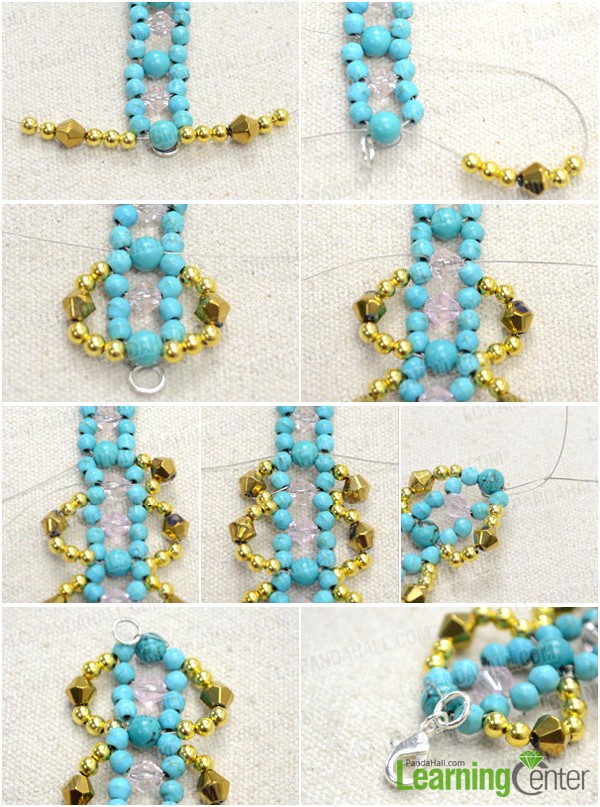
The final look of this right angle weave stitch bracelet is like this:

Cool! I love this turquoise and glass bicone beaded bracelet very much. If you want to know the more specific details about right angle weave stitch, I highly recommend you our “beading technique” category, and there is a section special for various stitches that surely include this one.

Comments (3)
-

-
Nov 25, 2013 at 01:32 AM Bead Andtrim
I must say that overall I am really impressed with this blog.It is easy to see that you are impassioned about your writing.
-
-
Nov 29, 2013 at 08:29 PM Bead Andtrim
The bracelet and bead work that you have shown in the blog post is simply alluring and magnetic work. i am surely going to buy this interesting jewelry. http://www.beadandtrim.com/category/machine-cut-chaton-roses/
-
-
Jan 09, 2014 at 09:38 PM Bead Andtrim
Yes, for the ones whoa re creating bracelets of their own for them this is the perfect blog that discuss details about it. http://beadandtrim.wordpress.com/


