- Comments (0)
- Oct 26, 2013
Instructions on Making Your Own Flower Cup Coaster with Double Half Hitch
Summary: Here is a tutorial about how to make a knotted flower pattern for your new cup coasters by using vertical half hitch. Just 7 colorful threads and your hands required!

This tutorial here is aiming to show you how to make a string flower coaster without any fancy knitted tools or skills! As long as you get a set of colorful threads at hands and know how to tie double half hitch, you’re able to finish the flower pattern in three parts! Here, to make a delicate flower coaster, I used the 1mm nylon thread with fine friction force. Here we go!
Supplies needed for the knotted flower coaster:
1mm Nylon Thread
Lighter
Scissors

How to make your own coaster pattern?
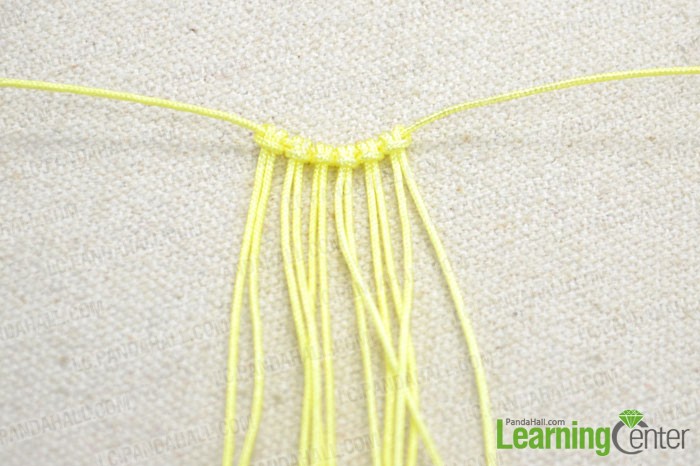
Step 1: Get started
1st, cut 7 pieces of yellow thread, each about 60cm long;
2nd, lay one horizontally on a flat;
3rd, fold the rest cords and tie them up to the center of horizontal cord one by one, with lark’s head knot.
Step 2: Add thread and start to make half part of a petal
1st, cut another 6 pieces of 1mm nylon thread in 6 different colors, each about 60cm;
2nd, loop the horizontal cord (yellow) in step 1 and regard the two ends as a holding end. Then, orderly tie the 6 colorful threads (dark green, light green, light blue, dark purple, light purple, orange) up to the holding end by using the overhand knot in same direction;
3rd, knot the two cords of holding end (yellow) to secure the newly added threads;
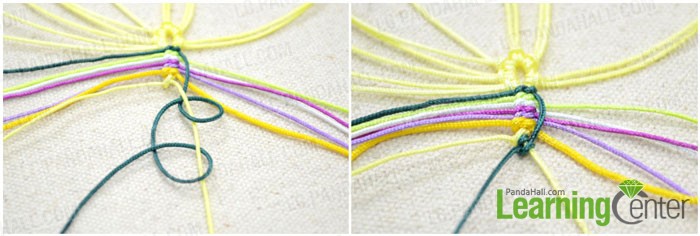
4th, make the Double Half Hitch on two sides alternately. (Design Tip: When tying Half Hitches of any type, you usually start by passing the working end under the holding end. Then you tie the Half Hitch.)
Divide the 14 threads into two equal parts. To make the first double half hitch, choose one side to start with (the right side in my tutorial) and follow the processes a to d:
a. determine the working end and holding end, here are the firstly added dark green cord and the yellow cord;
b. bring the working end (green) over the rest colorful ends and then pass under the holding end (yellow);
c. make the first half hitch by directing the working end over the holding end and then exit through the area between two cords;
d. repeat the c process on above for a complete double half hitch.
Straighten the holding end and then fasten the double half hitch.
Continually working the double half hitch with proper working end and holding end as the diagram on below shows:
|
Side |
Working End |
Holding End |
|
Left |
Dark Green |
Yellow & Dark Green |
|
Right |
Light Green |
Yellow & Dark Green |
|
Left |
Light Green |
Yellow, Dark Green & Light Green |
|
Right |
Light Blue |
Yellow, Dark Green & Light Green |
|
Right |
Dark Purple |
Yellow, Dark Green & Light Green |
|
Right |
Light Purple |
Yellow, Dark Green & Light Green |
|
Right |
Orange |
Yellow, Dark Green & Light Green |
|
Right |
Dark Purple, Light Purple & Orange |
Light Blue |
|
Right |
Light Purple & Orange |
Dark Purple |
|
Right |
Orange |
Light Purple |
|
Left |
Light Blue |
Yellow, Dark Green & Light Green |
|
Left |
Dark Purple |
Yellow, Dark Green & Light Green |
|
Left |
Light Purple |
Yellow, Dark Green & Light Green |
|
Left |
Orange |
Yellow, Dark Green & Light Green |
|
Left |
Dark Purple, Light Purple & Orange |
Light Blue |
|
Left |
Light Purple & Orange |
Dark Purple |
|
Left |
Orange |
Light Purple |

5th, add another 6 colorful threads and repeat the process on above for the half part of the 2nd petal.

Step 3: Compose two half part in step 2 and make a complete petal
1st, choose the two adjacent units from two different half parts in step 2;
2nd, work the double half hitch with proper working end and holding end as the diagram on below shows:
|
Side |
Working End |
Holding End |
|
Right |
Yellow (on left) |
Yellow (on right), Dark Green, Light Green, Light Blue, Dark Purple, Light Purple |
|
Left |
Yellow (on right) |
Dark Green, Light Green, Light Blue, Dark Purple, Light Purple |
|
Right |
Dark Green (on left) |
Dark Green (on right), Light Green, Light Blue, Dark Purple, Light Purple |
|
Left |
Dark Green (on right) |
Light Green, Light Blue, Dark Purple, Light Purple |
|
Right |
Light Green (on left) |
Light Green (on right), Light Blue, Dark Purple, Light Purple |
|
Left |
Light Green (on right) |
Light Blue, Dark Purple, Light Purple |
|
Right |
Light Blue (on left) |
Light Blue (on right), Dark Purple, Light Purple |
|
Left |
Light Blue (on right) |
Dark Purple, Light Purple |
|
Right |
Dark Purple (on left) |
Dark Purple (on right), Light Purple |
|
Left |
Dark Purple (on right) |
Light Purple |
|
Right |
Light Purple (on left) |
Light Purple (on right) |

Step 4: Complete the Chinese knot flower pattern
Repeat the step 2 and step 3 for the rest petals for the flower pattern.

Step5: Trim off the excess threads seal by lighter
1st, keep 1~2mm at each end of thread and remove the excess;
2nd, melt the leftovers carefully by lighter.

Done!

Here you’ve made the project finished! Time and thread aside, weaving such a knotted flower pattern is actually an amusing and challenging activity. What’s more, in addition to being used as a cup coaster, this beautiful Chinese knot flower can be turned into a decoration on a hat, headband, scarf or brooch as well. Hope it can be useful!