- Comments (0)
- Sep 29, 2013
Create Your Own Ring - DIY Bee Ring Project
Summary: This tutorial is to teach you how to make a DIY bee ring with gold copper wire and faceted abacus beads; in DIY ring tutorial, you will find what a great joy it is to create your own ring!
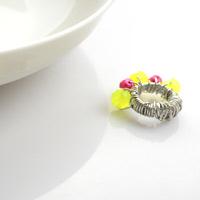
In the matter of fact, this bee ring is not that delicate as other jewelry projects show; because the copper wire that is widely used in this DIY ring is not easily hidden, the appearance of this bee ring seems quite rougher; however I believe this is a kind of natural beauty.

Materials and tools:
1.5mm gold aluminum wire
0.5mm gold copper wire
6mm red round acrylic bead
8mm yellow abacus acrylic bead
8mm blue abacus acrylic bead
Round nose plier
Flat nose plier
Wire cutter

Instructions:
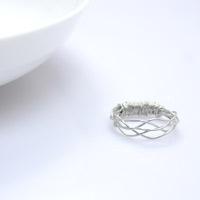
Step 1;Make ring shank and bee wings
1st, pick two pieces of aluminum wire that measure 25cm;
2nd, wrap them around a marker to determine the length of ring base;
3rd, pick one ring and coil both tails counter-clockwise, then the upper wings are done;
4th, pick the other ring and coil tails clockwise to finish the lower wings;

Step 2: Finish the bee ring
1st, wrap the ring base around marker again;
2nd, pick a 10cm piece of copper wire and fasten one end to left lower wing;
3rd, slide beads in the order: blue abacus bead, yellow abacus bead and red round bead;
4th, fix the end to left upper wing;
5th, similarly handle the right side to secure the beads from moving;
6th, pick a 10cm piece of copper wire, fold it in half and thread through the beads strung;
7th, slightly twine around wires above red bead and do coiling to finish the feeler.

Tada! The DIY bee ring is done! Nothing can add a more creative edge than this handcrafted bee ring; it proves that you are this season’s reigning queen of style with wrapped copper wire and colorful acrylic beads.